Welcome to the Embassy Book. The Embassy Book is for everyone who wants to use Embassy and understand how Embassy works.
Introduction
Embassy is a project to make async/await a first-class option for embedded development.
What is async?
When handling I/O, software must call functions that block program execution until the I/O operation completes. When running inside of an OS such as Linux, such functions generally transfer control to the kernel so that another task (known as a “thread”) can be executed if available, or the CPU can be put to sleep until another task is ready.
Because an OS cannot presume that threads will behave cooperatively, threads are relatively resource-intensive and may be forcibly interrupted if they do not transfer control back to the kernel within an allotted time. If tasks could instead be presumed to behave cooperatively, it would be possible to create tasks that are almost free when compared to a traditional OS thread.
In other programming languages, these lightweight tasks are known as “coroutines” or ”goroutines”. In Rust, they are implemented with async. Async-await works by transforming each async function into an object called a future. When a future blocks on I/O the future yields, and the scheduler, called an executor, can select a different future to execute.
Compared to alternatives such as an RTOS, async can yield better performance and lower power consumption because the executor doesn’t have to guess when a future is ready to execute. However, program size may be higher than other alternatives, which may be a problem for certain space-constrained devices with very low memory. On the devices Embassy supports, such as STM32 and nRF, memory is generally large enough to accommodate the modestly-increased program size.
What is Embassy?
The Embassy project consists of several crates that you can use together or independently:
Executor
The embassy-executor is an async/await executor that generally executes a fixed number of tasks, allocated at startup, though more can be added later. The executor may also provide a system timer that you can use for both async and blocking delays. For less than one microsecond, blocking delays should be used because the cost of context-switching is too high and the executor will be unable to provide accurate timing.
Hardware Abstraction Layers
HALs implement safe Rust API which let you use peripherals such as USART, UART, I2C, SPI, CAN, and USB without having to directly manipulate registers.
Embassy provides implementations of both async and blocking APIs where it makes sense. DMA (Direct Memory Access) is an example where async is a good fit, whereas GPIO states are a better fit for a blocking API.
The Embassy project maintains HALs for select hardware, but you can still use HALs from other projects with Embassy.
-
embassy-stm32, for all STM32 microcontroller families.
-
embassy-nrf, for the Nordic Semiconductor nRF52, nRF53, nRF54, nRF91 series.
-
embassy-rp, for the Raspberry Pi RP2040 as well as RP235x microcontroller.
-
embassy-mspm0, for the Texas Instruments MSPM0 microcontrollers.
-
esp-hal, for the Espressif Systems ESP32 series of chips.
-
ch32-hal, for the WCH 32-bit RISC-V(CH32V) series of chips.
-
mpfs-hal, for the Microchip PolarFire SoC.
-
py32-hal, for the Puya Semiconductor PY32 series of chips.
|
Note
|
A common question is if one can use the Embassy HALs standalone. Yes, it is possible! There is no dependency on the executor within the HALs. You can even use them without async, as they implement both the Embedded HAL blocking and async traits. |
Networking
The embassy-net network stack implements extensive networking functionality, including Ethernet, IP, TCP, UDP, ICMP and DHCP. Async drastically simplifies managing timeouts and serving multiple connections concurrently. Several drivers for WiFi and Ethernet chips can be found.
Bluetooth
-
The trouble crate provides a Bluetooth Low Energy 4.x and 5.x Host that runs on any microcontroller implementing the bt-hci traits (currently
nRF52,nrf54,rp2040,rp23xxandesp32andserialcontrollers are supported). -
The nrf-softdevice crate provides Bluetooth Low Energy 4.x and 5.x support for nRF52 microcontrollers.
LoRa
lora-rs supports LoRa networking on a wide range of LoRa radios, fully integrated with a Rust LoRaWAN implementation. It provides four crates — lora-phy, lora-modulation, lorawan-encoding, and lorawan-device — and basic examples for various development boards. It has support for STM32WL wireless microcontrollers or Semtech SX127x transceivers, among others.
USB
embassy-usb implements a device-side USB stack. Implementations for common classes such as USB serial (CDC ACM) and USB HID are available, and a rich builder API allows building your own.
Bootloader and DFU
embassy-boot is a lightweight bootloader supporting firmware application upgrades in a power-fail-safe way, with trial boots and rollbacks.
What is DMA?
For most I/O in embedded devices, the peripheral doesn’t directly support the transmission of multiple bytes at once, with CAN being a notable exception. Instead, the MCU must write each byte, one at a time, and then wait until the peripheral is ready to send the next. For high I/O rates, this can pose a problem if the MCU must devote an increasing portion of its time handling each byte. The solution to this problem is to use the Direct Memory Access controller.
The Direct Memory Access controller (DMA) is a controller that is present in MCUs that Embassy supports, including STM32 and nRF. The DMA allows the MCU to set up a transfer, either send or receive, and then wait for the transfer to complete. With DMA, once started, no MCU intervention is required until the transfer is complete, meaning that the MCU can perform other computation, or set up other I/O while the transfer is in progress. For high I/O rates, DMA can cut the time that the MCU spends handling I/O by over half. However, because DMA is more complex to set-up, it is less widely used in the embedded community. Embassy aims to change that by making DMA the first choice rather than the last. Using Embassy, there’s no additional tuning required once I/O rates increase because your application is already set-up to handle them.
Examples
Embassy provides examples for all HALs supported. You can find them in the examples/ folder.
Main loop example
use embassy_executor::Spawner;
use embassy_time::Timer;
use log::*;

#[embassy_executor::task]
async fn run() {
    loop {
        info!("tick");
        Timer::after_secs(1).await;
    }
}

#[embassy_executor::main]
async fn main(spawner: Spawner) {
    env_logger::builder()
        .filter_level(log::LevelFilter::Debug)
        .format_timestamp_nanos()
        .init();

    spawner.spawn(run().unwrap());
}
Embassy in the wild!
Here are known examples of real-world projects which make use of Embassy. Feel free to add more!
newer entries at the top
-
ESPress WheeLE: Remote-Controlled Rover via Bluetooth LE
-
Robust, energy-efficient, and safety-focused remote control solution for small-scale robotic platforms using instructions received via Bluetooth LE.
-
-
ProtoV MINI: A USB-C mini lab power supply
-
A dual-channel USB PD powered breadboard power supply based on the RP2040, running embedded graphics. Open-source schematics and firmware.
-
-
Opentrig: A particle physics trigger and data acquisition system
-
Digital event trigger with threshold, data acquisition system designed to interface with AIDA-2020 TLU systems, tested at the DESY II Test Beam Facility. Based on the RP2040, and Embassy’s async event handling.
-
-
-
Air Quality Monitor based on rp2350 board, ens160 and aht21 sensors and ssd1306 display. Code and 3D printable enclosure included.
-
-
Embassy Clock: Layered, modular bare-metal clock with emulation
-
A
no_stdRaspberry Pi Pico clock demonstrating layered Embassy tasks (Display→Blinker→Clock) for clean separation of multiplexing, blinking, and UI logic. Features single-button HH:MM/MM:SS time-set UI, heapless data structures, and a Renode emulator for hardware-free testing. See this article for details.
-
-
A simple tracked robot based on Raspberry Pi Pico 2
-
A hobbyist project building a tracked robot with basic autonomous and manual drive mode.
-
-
A Raspberry Pi Pico W Alarmclock
-
A hobbyist project building an alarm clock around a Pi Pico W complete with code, components list and enclosure design files.
-
-
RMK: A feature-rich Rust keyboard firmware
-
RMK has built-in layer support, wireless(BLE) support, real-time key editing support using vial, and more!
-
Targets STM32, RP2040, nRF52 and ESP32 MCUs
-
-
Printhor: The highly reliable but not necessarily functional 3D printer firmware
-
Targets some STM32 MCUs
-
-
Card/IO firmware - firmware for an open source ECG device
-
Targets the ESP32-S3 or ESP32-C6 MCU
-
-
The lora-rs project includes various standalone examples for NRF52840, RP2040, STM32L0 and STM32WL
-
Air force one: A simple air quality monitoring system
-
Targets nRF52 and uses nrf-softdevice
-
-
YLab Edge Go and YLab Edge Pro projects develop firmware (RP2040, STM32) for capturing physiological data in behavioural science research. Included so far are:
-
biopotentials (analog ports)
-
motion capture (6-axis accelerometers)
-
air quality (CO2, Temp, Humidity)
-
comes with an app for capturing and visualizing data [Ystudio]
-
For beginners
The articles in this section are primarily aimed at users new to Embassy, showing how to get started, how to structure your project and other best practices.
Getting started
So you want to try Embassy, great! To get started, there are a few tools you need to install:
If you don’t have any supported board, don’t worry: you can also run embassy on your PC using the std examples.
Getting a board with examples
Embassy supports many microcontroller families, but the quickest way to get started is by using a board which Embassy has existing example code for.
This list is non-exhaustive. If your board isn’t included here, check the examples folder to see if example code has been written for it.
Running an example
First you need to clone the github repository;
git clone https://github.com/embassy-rs/embassy.git
cd embassy
Once you have a copy of the repository, find the examples folder for your board and build an example program. blinky is a good choice as all it does is blink an LED – the embedded world’s equivalent of “Hello World”.
cd examples/nrf52840
cargo build --bin blinky --release
Once you’ve confirmed you can build the example, connect your computer to your board with a debug probe and run it on hardware:
cargo run --bin blinky --releaseIf everything worked correctly, you should see a blinking LED on your board, and debug output similar to this on your computer:
    Finished dev [unoptimized + debuginfo] target(s) in 1m 56s
     Running `probe-rs run --chip STM32F407VGTx target/thumbv7em-none-eabi/debug/blinky`
(HOST) INFO  flashing program (71.36 KiB)
(HOST) INFO  success!
────────────────────────────────────────────────────────────────────────────────
0 INFO  Hello World!
└─ blinky::__embassy_main::task::{generator#0} @ src/bin/blinky.rs:18
1 INFO  high
└─ blinky::__embassy_main::task::{generator#0} @ src/bin/blinky.rs:23
2 INFO  low
└─ blinky::__embassy_main::task::{generator#0} @ src/bin/blinky.rs:27
3 INFO  high
└─ blinky::__embassy_main::task::{generator#0} @ src/bin/blinky.rs:23
4 INFO  low
└─ blinky::__embassy_main::task::{generator#0} @ src/bin/blinky.rs:27|
Note
|
How does the cargo run command know how to connect to our board and program it? In each examples folder, there’s a .cargo/config.toml file which tells cargo to use probe-rs as the runner for ARM binaries in that folder. probe-rs handles communication with the debug probe and MCU. In order for this to work, probe-rs needs to know which chip it’s programming, so you’ll have to edit this file if you want to run examples on other chips.
|
It didn’t work!
If you are having issues when running cargo run --release, please check the following:
-
You are specifying the correct
--chipon the command line, OR -
You have set
.cargo/config.toml’s run line to the correct chip, AND -
You have changed
examples/Cargo.toml’s HAL (e.g. embassy-stm32) dependency’s feature to use the correct chip (replace the existing stm32xxxx feature)
At this point the project should run. If you do not see a blinky LED for blinky, for example, be sure to check the code is toggling your board’s LED pin.
If you are trying to run an example with cargo run --release and you see the following output:
0.000000 INFO Hello World!
└─ <invalid location: defmt frame-index: 14>
0.000000 DEBUG rcc: Clocks { sys: Hertz(80000000), apb1: Hertz(80000000), apb1_tim: Hertz(80000000), apb2: Hertz(80000000), apb2_tim: Hertz(80000000), ahb1: Hertz(80000000), ahb2: Hertz(80000000), ahb3: Hertz(80000000) }
└─ <invalid location: defmt frame-index: 124>
0.000061 TRACE allocating type=Interrupt mps=8 interval_ms=255, dir=In
└─ <invalid location: defmt frame-index: 68>
0.000091 TRACE   index=1
└─ <invalid location: defmt frame-index: 72>
To get rid of the frame-index error add the following to your Cargo.toml:
[profile.release]
debug = 2
If you’re getting an extremely long error message containing something like the following:
error[E0463]: can't find crate for `std`
  |
  = note: the `thumbv6m-none-eabi` target may not support the standard library
  = note: `std` is required by `stable_deref_trait` because it does not declare `#![no_std]`
Make sure that you didn’t accidentally run cargo add probe-rs (which adds it as a dependency) instead of correctly installing probe-rs.
If you’re using a raspberry pi pico-w, make sure you’re running cargo run --bin wifi_blinky --release rather than the regular blinky. The pico-w’s on-board LED is connected to the WiFi chip, which needs to be initialized before the LED can be blinked.
If you’re using an rp2040 debug probe (e.g. the pico probe) and are having issues after running probe-rs info, unplug and reconnect the probe, letting it power cycle. Running probe-rs info is known to put the pico probe into an unusable state.
If you’re still having problems, check the FAQ, or ask for help in the Embassy Chat Room.
What’s next?
Congratulations, you have your first Embassy application running! Here are some suggestions for where to go from here:
-
Read more about the executor.
-
Read more about the HAL.
-
Start writing your application.
-
Learn how to start a new embassy project by adapting an example.
A basic Embassy application
So you’ve got one of the examples running, but what now? Let’s go through a simple Embassy application for the nRF52 DK to understand it better.
Main
The full example can be found here.
|
Note
|
If you’re using VS Code and rust-analyzer to view and edit the examples, you may need to make some changes to .vscode/settings.json to tell it which project we’re working on. Follow the instructions commented in that file to get rust-analyzer working correctly.
|
Bare metal
The first thing you’ll notice are two attributes at the top of the file. These tell the compiler that the program has no access to std, and that there is no main function (because it is not run by an OS).
#![no_std]
#![no_main]
Dealing with errors
Then, what follows are some declarations on how to deal with panics and faults. During development, a good practice is to rely on defmt-rtt and panic-probe to print diagnostics to the terminal:
use {defmt_rtt as _, panic_probe as _};Task declaration
After a bit of import declaration, the tasks run by the application should be declared:
#[embassy_executor::task]
async fn blink(pin: Peri<'static, AnyPin>) {
    let mut led = Output::new(pin, Level::Low, OutputDrive::Standard);

    loop {
        // Timekeeping is globally available, no need to mess with hardware timers.
        led.set_high();
        Timer::after_millis(150).await;
        led.set_low();
        Timer::after_millis(150).await;
    }
}
An embassy task must be declared async, and may NOT take generic arguments. In this case, we are handed the LED that should be blinked and the interval of the blinking.
|
Note
|
Notice that there is no busy waiting going on in this task. It is using the Embassy timer to yield execution, allowing the microcontroller to sleep in between the blinking. |
Main
The main entry point of an Embassy application is defined using the #[embassy_executor::main] macro. The entry point is passed a Spawner, which it can use to spawn other tasks.
We then initialize the HAL with a default config, which gives us a Peripherals struct we can use to access the MCU’s various peripherals. In this case, we want to configure one of the pins as a GPIO output driving the LED:
#[embassy_executor::main]
async fn main(spawner: Spawner) {
    // Initialize the embassy-nrf HAL.
    let p = embassy_nrf::init(Default::default());

    // Spawned tasks run in the background, concurrently.
    spawner.spawn(blink(p.P0_13.into()).unwrap());

    let mut button = Input::new(p.P0_11, Pull::Up);
    loop {
        // Asynchronously wait for GPIO events, allowing other tasks
        // to run, or the core to sleep.
        button.wait_for_low().await;
        info!("Button pressed!");
        button.wait_for_high().await;
        info!("Button released!");
    }
}
What happens when the blinker task has been spawned and main returns? Well, the main entry point is actually just like any other task, except that you can only have one and it takes some specific type arguments. The magic lies within the #[embassy_executor::main] macro. The macro does the following:
-
Creates an Embassy Executor
-
Defines a main task for the entry point
-
Runs the executor spawning the main task
There is also a way to run the executor without using the macro, in which case you have to create the Executor instance yourself.
The Cargo.toml
The project definition needs to contain the embassy dependencies:
embassy-executor = { version = "0.10.0", path = "../../../embassy-executor", features = ["defmt", "platform-cortex-m", "executor-thread"] }
embassy-time = { version = "0.5.1", path = "../../../embassy-time", features = ["defmt"] }
embassy-nrf = { version = "0.11.0", path = "../../../embassy-nrf", features = ["defmt", "nrf52840", "time-driver-rtc1", "gpiote"] }
Depending on your microcontroller, you may need to replace embassy-nrf with something else (embassy-stm32 for STM32. Remember to update feature flags as well).
In this particular case, the nrf52840 chip is selected, and the RTC1 peripheral is used as the time driver.
Project Structure
There are many ways to configure embassy and its components for your exact application. The examples directory for each chipset demonstrates how your project structure should look. Let’s break it down:
The toplevel file structure of your project should look like this:
{} = Maybe

my-project
|- .cargo
|  |- config.toml
|- src
|  |- main.rs
|- build.rs
|- Cargo.toml
|- {memory.x}
|- rust-toolchain.toml
.cargo/config.toml
This directory/file describes what platform you’re on, and configures probe-rs to deploy to your device.
Here is a minimal example:
[target.thumbv6m-none-eabi] # <-change for your platform
runner = 'probe-rs run --chip STM32F031K6Tx' # <- change for your chip

[build]
target = "thumbv6m-none-eabi" # <-change for your platform

[env]
DEFMT_LOG = "trace" # <- can change to info, warn, or error
build.rs
This is the build script for your project. It links defmt (what is defmt?) and the memory.x file if needed. This file is pretty specific for each chipset, just copy and paste from the corresponding example.
Cargo.toml
This is your manifest file, where you can configure all of the embassy components to use the features you need.
Features
Time
-
tick-hz-x: Configures the tick rate of
embassy-time. Higher tick rate means higher precision, and higher CPU wakes. -
defmt-timestamp-uptime: defmt log entries will display the uptime in seconds.
…more to come
memory.x
This file outlines the flash/ram usage of your program. It is especially useful when using nrf-softdevice on an nRF5x.
Here is an example for using S140 with an nRF52840:
MEMORY
{
  /* NOTE 1 K = 1 KiBi = 1024 bytes */
  /* These values correspond to the NRF52840 with Softdevices S140 7.0.1 */
  FLASH : ORIGIN = 0x00027000, LENGTH = 868K
  RAM : ORIGIN = 0x20020000, LENGTH = 128K
}
rust-toolchain.toml
This file configures the rust version and configuration to use.
A minimal example:
[toolchain]
channel = "1.85" # <- as of writing, this is the exact rust version embassy uses
components = [ "rust-src", "rustfmt" ] # <- optionally add "llvm-tools-preview" for some extra features like "cargo size"
targets = [
    "thumbv6m-none-eabi" # <- change for your platform
]
Starting a new project
Once you’ve successfully run some example projects, the next step is to make a standalone Embassy project.
Tools for generating Embassy projects
CLI
-
cargo-embassy (STM32 and NRF)
cargo-generate
-
embassy-template (STM32, NRF, and RP)
esp-generate
-
esp-generate (ESP32 using esp-hal)
Starting a project from scratch
As an example, let’s create a new embassy project from scratch for a STM32G474. The same instructions are applicable for any supported chip with some minor changes.
Run:
cargo new stm32g474-example
cd stm32g474-example
to create an empty rust project:
stm32g474-example
├── Cargo.toml
└── src
    └── main.rs
Looking in the Embassy examples, we can see there’s a stm32g4 folder. Find src/blinky.rs and copy its contents into our src/main.rs.
The .cargo/config.toml
Currently, we’d need to provide cargo with a target triple every time we run cargo build or cargo run. Let’s spare ourselves that work by copying .cargo/config.toml from examples/stm32g4 into our project.
stm32g474-example
├── .cargo
│   └── config.toml
├── Cargo.toml
└── src
    └── main.rs
In addition to a target triple, .cargo/config.toml contains a runner key which allows us to conveniently run our project on hardware with cargo run via probe-rs. In order for this to work, we need to provide the correct chip ID. We can do this by checking probe-rs chip list:
$ probe-rs chip list | grep -i stm32g474re
        STM32G474RETx
and copying STM32G474RETx into .cargo/config.toml as so:
[target.'cfg(all(target_arch = "arm", target_os = "none"))']
# replace STM32G071C8Rx with your chip as listed in `probe-rs chip list`
runner = "probe-rs run --chip STM32G474RETx"
Cargo.toml
Now that cargo knows what target to compile for (and probe-rs knows what chip to run it on), we’re ready to add some dependencies.
Looking in examples/stm32g4/Cargo.toml, we can see that the examples require a number of embassy crates. For blinky, we’ll only need three of them: embassy-stm32, embassy-executor and embassy-time.
At the time of writing, embassy is already published to crates.io. Therefore, dependencies can easily be added in Cargo.toml.
[dependencies]
embassy-stm32 = { version = "0.1.0", features =  ["defmt", "time-driver-any", "stm32g474re", "memory-x", "unstable-pac", "exti"] }
embassy-executor = { version = "0.6.3", features = ["nightly", "platform-cortex-m", "executor-thread", "defmt"] }
embassy-time = { version = "0.3.2", features = ["defmt", "defmt-timestamp-uptime", "tick-hz-32_768"] }
Previously, embassy needed to be installed straight from the git repository. Installing from git is still useful, if you want to checkout a specific revision of an embassy crate which is not yet published. The recommended way of doing so is:
-
Copy the required
embassy-*lines from the exampleCargo.toml -
Make any necessary changes to
features, e.g. requiring thestm32g474refeature ofembassy-stm32 -
Remove the
path = ""keys in theembassy-*entries -
Create a
[patch.crates-io]section, with entries for each embassy crate we need. These should all contain identical values: a link to the git repository, and a reference to the commit we’re checking out. Assuming you want the latest commit, you can find it by runninggit ls-remote https://github.com/embassy-rs/embassy.git HEAD
|
Note
|
When using this method, it’s necessary that the version keys in [dependencies] match up with the versions defined in each crate’s Cargo.toml in the specificed rev under [patch.crates.io]. This means that when updating, you have to a pick a new revision, change everything in [patch.crates.io] to match it, and then correct any versions under [dependencies] which have changed.
|
An example Cargo.toml file follows. Note that the version values must match the versions defined in the embassy crates at the git revision you are checking out, which may differ from the latest published versions on crates.io:
[dependencies]
embassy-stm32 = {version = "0.1.0", features =  ["defmt", "time-driver-any", "stm32g474re", "memory-x", "unstable-pac", "exti"]}
embassy-executor = { version = "0.6.3", features = ["platform-cortex-m", "executor-thread", "defmt"] }
embassy-time = { version = "0.3.2", features = ["defmt", "defmt-timestamp-uptime", "tick-hz-32_768"] }

[patch.crates-io]
embassy-time = { git = "https://github.com/embassy-rs/embassy", rev = "7703f47c1ecac029f603033b7977d9a2becef48c" }
embassy-executor = { git = "https://github.com/embassy-rs/embassy", rev = "7703f47c1ecac029f603033b7977d9a2becef48c" }
embassy-stm32 = { git = "https://github.com/embassy-rs/embassy", rev = "7703f47c1ecac029f603033b7977d9a2becef48c" }
There are a few other dependencies we need to build the project, but fortunately they’re much simpler to install. Copy their lines from the example Cargo.toml to the [dependencies] section in the new Cargo.toml:
defmt = "0.3.5"
defmt-rtt = "0.4.0"
cortex-m = {version = "0.7.7", features = ["critical-section-single-core"]}
cortex-m-rt = "0.7.3"
panic-probe = "0.3.1"
These are the bare minimum dependencies required to run blinky.rs, but it’s worth taking a look at the other dependencies specified in the example Cargo.toml, and noting what features are required for use with embassy – for example futures = { version = "0.3.17", default-features = false, features = ["async-await"] }.
Finally, copy the [profile.release] section from the example Cargo.toml into ours:
[profile.release]
debug = 2
rust-toolchain.toml
Before we can build our project, we need to add an additional file to tell cargo which toolchain to use. Copy the rust-toolchain.toml from the embassy repo to ours, and trim the list of targets down to only the target triple relevent for our project — in this case, thumbv7em-none-eabi:
stm32g474-example
├── .cargo
│   └── config.toml
├── Cargo.toml
├── rust-toolchain.toml
└── src
    └── main.rs
# Before upgrading check that everything is available on all tier1 targets here:
# https://rust-lang.github.io/rustup-components-history
[toolchain]
channel = "1.85"
components = [ "rust-src", "rustfmt", "llvm-tools", "miri" ]
targets = ["thumbv7em-none-eabi"]build.rs
In order to produce a working binary for our target, cargo requires a custom build script. Copy build.rs from the example to our project:
stm32g474-example
├── build.rs
├── .cargo
│   └── config.toml
├── Cargo.toml
├── rust-toolchain.toml
└── src
    └── main.rs
Building and running
At this point, we‘re finally ready to build and run our project! Connect your board via a debug probe and run:
cargo run --releaseshould result in a blinking LED (if there’s one attached to the pin in src/main.rs – change it if not!) and the following output:
   Compiling stm32g474-example v0.1.0 (/home/you/stm32g474-example)
    Finished release [optimized + debuginfo] target(s) in 0.22s
     Running `probe-rs run --chip STM32G474RETx target/thumbv7em-none-eabi/release/stm32g474-example`
     Erasing sectors ✔ [00:00:00] [#########################################################] 18.00 KiB/18.00 KiB @ 54.09 KiB/s (eta 0s )
 Programming pages   ✔ [00:00:00] [#########################################################] 17.00 KiB/17.00 KiB @ 35.91 KiB/s (eta 0s )    Finished in 0.817s
0.000000 TRACE BDCR configured: 00008200
└─ embassy_stm32::rcc::bd::{impl#3}::init::{closure#4} @ /home/you/.cargo/git/checkouts/embassy-9312dcb0ed774b29/7703f47/embassy-stm32/src/fmt.rs:117
0.000000 DEBUG rcc: Clocks { sys: Hertz(16000000), pclk1: Hertz(16000000), pclk1_tim: Hertz(16000000), pclk2: Hertz(16000000), pclk2_tim: Hertz(16000000), hclk1: Hertz(16000000), hclk2: Hertz(16000000), pll1_p: None, adc: None, adc34: None, rtc: Some(Hertz(32000)) }
└─ embassy_stm32::rcc::set_freqs @ /home/you/.cargo/git/checkouts/embassy-9312dcb0ed774b29/7703f47/embassy-stm32/src/fmt.rs:130
0.000000 INFO  Hello World!
└─ embassy_stm32g474::____embassy_main_task::{async_fn#0} @ src/main.rs:14
0.000091 INFO  high
└─ embassy_stm32g474::____embassy_main_task::{async_fn#0} @ src/main.rs:19
0.300201 INFO  low
└─ embassy_stm32g474::____embassy_main_task::{async_fn#0} @ src/main.rs:23
Best Practices
Over time, a couple of best practices have emerged. The following list should serve as a guideline for developers writing embedded software in Rust, especially in the context of the Embassy framework.
Passing Buffers by Reference
It may be tempting to pass arrays or wrappers, like heapless::Vec,
to a function or return one just like you would with a std::Vec. However, in most embedded applications you don’t
want to spend resources on an allocator and end up placing buffers on the stack. This, however, can easily blow up
your stack if you are not careful.
Consider the following example:
fn process_buffer(mut buf: [u8; 1024]) -> [u8; 1024] {
    // do stuff and return new buffer
    for elem in buf.iter_mut() {
        *elem = 0;
    }
    buf
}

pub fn main() -> () {
    let buf = [1u8; 1024];
    let buf_new = process_buffer(buf);
    // do stuff with buf_new
    ()
}
When calling process_buffer in your program, a copy of the buffer you pass to the function will be created,
consuming another 1024 bytes.
After the processing, another 1024 byte buffer will be placed on the stack to be returned to the caller.
(You can check the assembly, there will be two memcopy operations, e.g., bl __aeabi_memcpy when compiling for a Cortex-M processor.)
Possible Solution:
Pass the data by reference and not by value on both, the way in and the way out. For example, you could return a slice of the input buffer as the output. Requiring the lifetime of the input slice and the output slice to be the same, the memory safety of this procedure will be enforced by the compiler.
fn process_buffer<'a>(buf: &'a mut [u8]) -> &'a mut[u8] {
    for elem in buf.iter_mut() {
        *elem = 0;
    }
    buf
}

pub fn main() -> () {
    let mut buf = [1u8; 1024];
    let buf_new = process_buffer(&mut buf);
    // do stuff with buf_new
    ()
}
From bare metal to async Rust
If you’re new to Embassy, it can be overwhelming to grasp all the terminology and concepts. This guide aims to clarify the different layers in Embassy, which problem each layer solves for the application writer.
This guide uses the STM32 IOT01A board, but should be easy to translate to any STM32 chip. For nRF, the PAC itself is not maintained within the Embassy project, but the concepts and the layers are similar.
The application we’ll write is a simple 'push button, blink led' application, which is great for illustrating input and output handling for each of the examples we’ll go through. We’ll start at the Peripheral Access Crate (PAC) example and end at the async example.
PAC version
The PAC is the lowest API for accessing peripherals and registers, if you don’t count reading/writing directly to memory addresses. It provides distinct types to make accessing peripheral registers easier, but it does little to prevent you from configuring or coordinating those registers incorrectly.
Writing an application using the PAC directly is therefore not recommended, but if the functionality you want to use is not exposed in the upper layers, that’s what you need to use.
The blinky app using PAC is shown below:
#![no_std]
#![no_main]

use pac::gpio::vals;
use {defmt_rtt as _, panic_probe as _, stm32_metapac as pac};

#[cortex_m_rt::entry]
fn main() -> ! {
    // Enable GPIO clock
    let rcc = pac::RCC;
    rcc.ahb2enr().modify(|w| {
        w.set_gpioben(true);
        w.set_gpiocen(true);
    });

    rcc.ahb2rstr().modify(|w| {
        w.set_gpiobrst(true);
        w.set_gpiocrst(true);
        w.set_gpiobrst(false);
        w.set_gpiocrst(false);
    });

    // Setup button
    let gpioc = pac::GPIOC;
    const BUTTON_PIN: usize = 13;
    gpioc.pupdr().modify(|w| w.set_pupdr(BUTTON_PIN, vals::Pupdr::PullUp));
    gpioc.otyper().modify(|w| w.set_ot(BUTTON_PIN, vals::Ot::PushPull));
    gpioc.moder().modify(|w| w.set_moder(BUTTON_PIN, vals::Moder::Input));

    // Setup LED
    let gpiob = pac::GPIOB;
    const LED_PIN: usize = 14;
    gpiob.pupdr().modify(|w| w.set_pupdr(LED_PIN, vals::Pupdr::Floating));
    gpiob.otyper().modify(|w| w.set_ot(LED_PIN, vals::Ot::PushPull));
    gpiob.moder().modify(|w| w.set_moder(LED_PIN, vals::Moder::Output));

    // Main loop
    loop {
        if gpioc.idr().read().idr(BUTTON_PIN) == vals::Idr::Low {
            gpiob.bsrr().write(|w| w.set_bs(LED_PIN, true));
        } else {
            gpiob.bsrr().write(|w| w.set_br(LED_PIN, true));
        }
    }
}
As you can see, a lot of code is needed to enable the peripheral clocks and to configure the input pins and the output pins of the application.
Another downside of this application is that it is busy-looping while polling the button state. This prevents the microcontroller from utilizing any sleep mode to save power.
HAL version
To simplify our application, we can use the HAL instead. The HAL exposes higher level APIs that handle details such as:
-
Automatically enabling the peripheral clock when you’re using the peripheral
-
Deriving and applying register configuration from higher level types
-
Implementing the embedded-hal traits to make peripherals useful in third party drivers
The HAL example is shown below:
#![no_std]
#![no_main]

use cortex_m_rt::entry;
use embassy_stm32::gpio::{Input, Level, Output, Pull, Speed};
use {defmt_rtt as _, panic_probe as _};

#[entry]
fn main() -> ! {
    let p = embassy_stm32::init(Default::default());
    let mut led = Output::new(p.PB14, Level::High, Speed::VeryHigh);
    let button = Input::new(p.PC13, Pull::Up);

    loop {
        if button.is_low() {
            led.set_high();
        } else {
            led.set_low();
        }
    }
}
As you can see, the application becomes a lot simpler, even without using any async code. The Input and Output types hide all the details of accessing the GPIO registers and allow you to use a much simpler API for querying the state of the button and toggling the LED output.
The same downside from the PAC example still applies though: the application is busy looping and consuming more power than necessary.
Interrupt driven
To save power, we need to configure the application so that it can be notified when the button is pressed using an interrupt.
Once the interrupt is configured, the application can instruct the microcontroller to enter a sleep mode, consuming very little power.
Given Embassy focus on async Rust (which we’ll come back to after this example), the example application must use a combination of the HAL and PAC in order to use interrupts. For this reason, the application also contains some helper functions to access the PAC (not shown below).
#![no_std]
#![no_main]

use core::cell::RefCell;

use cortex_m::interrupt::Mutex;
use cortex_m::peripheral::NVIC;
use cortex_m_rt::entry;
use embassy_stm32::gpio::{Input, Level, Output, Pull, Speed};
use embassy_stm32::{interrupt, pac};
use {defmt_rtt as _, panic_probe as _};

static BUTTON: Mutex<RefCell<Option<Input<'static>>>> = Mutex::new(RefCell::new(None));
static LED: Mutex<RefCell<Option<Output<'static>>>> = Mutex::new(RefCell::new(None));

#[entry]
fn main() -> ! {
    let p = embassy_stm32::init(Default::default());
    let led = Output::new(p.PB14, Level::Low, Speed::Low);
    let mut button = Input::new(p.PC13, Pull::Up);

    cortex_m::interrupt::free(|cs| {
        enable_interrupt(&mut button);

        LED.borrow(cs).borrow_mut().replace(led);
        BUTTON.borrow(cs).borrow_mut().replace(button);

        unsafe { NVIC::unmask(pac::Interrupt::EXTI15_10) };
    });

    loop {
        cortex_m::asm::wfe();
    }
}

#[interrupt]
fn EXTI15_10() {
    cortex_m::interrupt::free(|cs| {
        let mut button = BUTTON.borrow(cs).borrow_mut();
        let button = button.as_mut().unwrap();

        let mut led = LED.borrow(cs).borrow_mut();
        let led = led.as_mut().unwrap();
        if check_interrupt(button) {
            if button.is_low() {
                led.set_high();
            } else {
                led.set_low();
            }
        }
        clear_interrupt(button);
    });
}
//
//
//
//
The simple application is now more complex again, primarily because of the need to keep the button and LED states in the global scope where it is accessible by the main application loop, as well as the interrupt handler.
To do that, the types must be guarded by a mutex, and interrupts must be disabled whenever we are accessing this global state to gain access to the peripherals.
Luckily, there is an elegant solution to this problem when using Embassy.
Async version
It’s time to use the Embassy capabilities to its fullest. At the core, Embassy has an async executor, or a runtime for async tasks if you will. The executor polls a set of tasks (defined at compile time), and whenever a task blocks, the executor will run another task, or put the microcontroller to sleep.
#![no_std]
#![no_main]

use embassy_executor::Spawner;
use embassy_stm32::exti::{self, ExtiInput};
use embassy_stm32::gpio::{Level, Output, Pull, Speed};
use embassy_stm32::{bind_interrupts, interrupt};
use {defmt_rtt as _, panic_probe as _};

bind_interrupts!(
    pub struct Irqs{
        EXTI15_10  => exti::InterruptHandler<interrupt::typelevel::EXTI15_10 >;
});

#[embassy_executor::main]
async fn main(_spawner: Spawner) {
    let p = embassy_stm32::init(Default::default());
    let mut led = Output::new(p.PB14, Level::Low, Speed::VeryHigh);
    let mut button = ExtiInput::new(p.PC13, p.EXTI13, Pull::Up, Irqs);

    loop {
        button.wait_for_any_edge().await;
        if button.is_low() {
            led.set_high();
        } else {
            led.set_low();
        }
    }
}
The async version looks very similar to the HAL version, apart from a few minor details:
-
The main entry point is annotated with a different macro and has an async type signature. This macro creates and starts an Embassy runtime instance and launches the main application task. Using the
Spawnerinstance, the application may spawn other tasks. -
The peripheral initialization is done by the main macro, and is handed to the main task.
-
Before checking the button state, the application is awaiting a transition in the pin state (low → high or high → low).
When button.wait_for_any_edge().await is called, the executor will pause the main task and put the microcontroller in sleep mode, unless there are other tasks that can run. On this chip, interrupt signals on EXTI lines 10-15 (including the button on EXTI line 13) raise the hardware interrupt EXTI15_10. This interrupt handler has been bound (using bind_interrupts!) to call the InterruptHandler provided by the exti module, so that whenever an interrupt is raised, the task awaiting the button via wait_for_any_edge() will be woken up.
The minimal overhead of the executor and the ability to run multiple tasks "concurrently" combined with the enormous simplification of the application, makes async a great fit for embedded.
What’s next?
Now that you’re familiar with the basics, the System description section covers the executor, HALs, bootloader, and other Embassy components in more detail.
For developers
This section covers the internals of Embassy, aimed at contributors and developers who want to understand how Embassy is built or add support for new hardware.
STM32
Understanding metapac
When a project that imports embassy-stm32 is compiled, that project selects the feature corresponding to the chip that project is using. Based on that feature, embassy-stm32 selects supported IP for the chip, and enables the corresponding HAL implementations. But how does embassy-stm32 know what IP the chip contains, out of the hundreds of chips that we support? It’s a long story that starts with stm32-data-sources.
stm32-data-sources
stm32-data-sources is a mostly barren repository. It has no README, no documentation, and few watchers. But it’s the core of what makes embassy-stm32 possible. The data for every chip that we support is taken in part from a corresponding XML file like STM32F051K4Ux.xml. In that file, you’ll see lines like the following:
    <IP InstanceName="I2C1" Name="I2C" Version="i2c2_v1_1_Cube"/>
    <!-- snip  -->
    <IP ConfigFile="TIM-STM32F0xx" InstanceName="TIM1" Name="TIM1_8F0" Version="gptimer2_v2_x_Cube"/>
These lines indicate that this chip has an i2c, and that it’s version is "v1_1". It also indicates that it has a general purpose timer that with a version of "v2_x". From this data, it’s possible to determine which implementations should be included in embassy-stm32. But actually doing that is another matter.
stm32-data
While all users of this project are familiar with embassy-stm32, fewer are familiar with the project that powers it: stm32-data. This project doesn’t just aim to generate data for embassy-stm32, but for machine consumption in general. To achieve this, information from multiple files from the stm32-data-sources project are combined and parsed to assign register block implementations for each supported IP. The core of this matching resides in chips.rs:
    (".*:I2C:i2c2_v1_1", ("i2c", "v2", "I2C")),
    // snip
    (r".*TIM\d.*:gptimer.*", ("timer", "v1", "TIM_GP16")),
In this case, the i2c version corresponds to our "v2" and the general purpose timer version corresponds to our "v1". Therefore, the i2c_v2.yaml and timer_v1.yaml register block implementations are assigned to those IP, respectively. The result is that these lines are generated in STM32F051K4.json:
    {
        "name": "I2C1",
        "address": 1073763328,
        "registers": {
            "kind": "i2c",
            "version": "v2",
            "block": "I2C"
        },
        // snip
    }
    // snip
    {
        "name": "TIM1",
        "address": 1073818624,
        "registers": {
            "kind": "timer",
            "version": "v1",
            "block": "TIM_ADV"
        },
        // snip
    }
In addition to register blocks, data for pin and RCC mapping is also generated and consumed by embassy-stm32. stm32-metapac-gen is used to package and publish the data as a crate.
embassy-stm32
In the lib.rs file located in the root of embassy-stm32, you’ll see this line:
#[cfg(i2c)]
pub mod i2c;
And in the mod.rs of the i2c mod, you’ll see this:
#[cfg_attr(i2c_v2, path = "v2.rs")]Because i2c is supported for STM32F051K4 and its version corresponds to our "v2", the i2c and i2c_v2, configuration directives will be present, and embassy-stm32 will include these files, respectively. This and other configuration directives and tables are generated from the data for chip, allowing embassy-stm32 to expressively and clearly adapt logic and implementations to what is required for each chip. Compared to other projects across the embedded ecosystem, embassy-stm32 is the only project that can re-use code across the entire stm32 lineup and remove difficult-to-implement unsafe logic to the HAL.
System description
This section describes different parts of Embassy in more detail.
Embassy executor
The Embassy executor is an async/await executor designed for embedded usage along with support functionality for interrupts and timers.
Features
-
No
alloc, no heap needed. Tasks are statically allocated. -
No "fixed capacity" data structures, executor works with 1 or 1000 tasks without needing config/tuning.
-
Integrated timer queue: sleeping is easy, just do
Timer::after_secs(1).await;. -
No busy-loop polling: CPU sleeps when there’s no work to do, using interrupts or
WFE/SEV. -
Efficient polling: a wake will only poll the woken task, not all of them.
-
Fair: a task can’t monopolize CPU time even if it’s constantly being woken. All other tasks get a chance to run before a given task gets polled for the second time.
-
Multiple executor instances can be created, to run tasks at different priority levels. This allows higher-priority tasks to preempt lower-priority tasks.
Executor
The executor works as follows:
-
When a task is created, it is polled.
-
The task attempts to make progress until it reaches a point where it would be blocked. This may happen whenever a task is
.await-ing an async function. When that happens, the task yields execution by returningPoll::Pending. -
Once a task yields, the executor enqueues the task at the end of the run queue and proceeds to poll the next task in the queue.
When a task is finished or canceled, it will not be enqueued again.
|
Important
|
The executor relies on tasks not blocking indefinitely, this would prevent the executor regaining control and scheduling another task. |
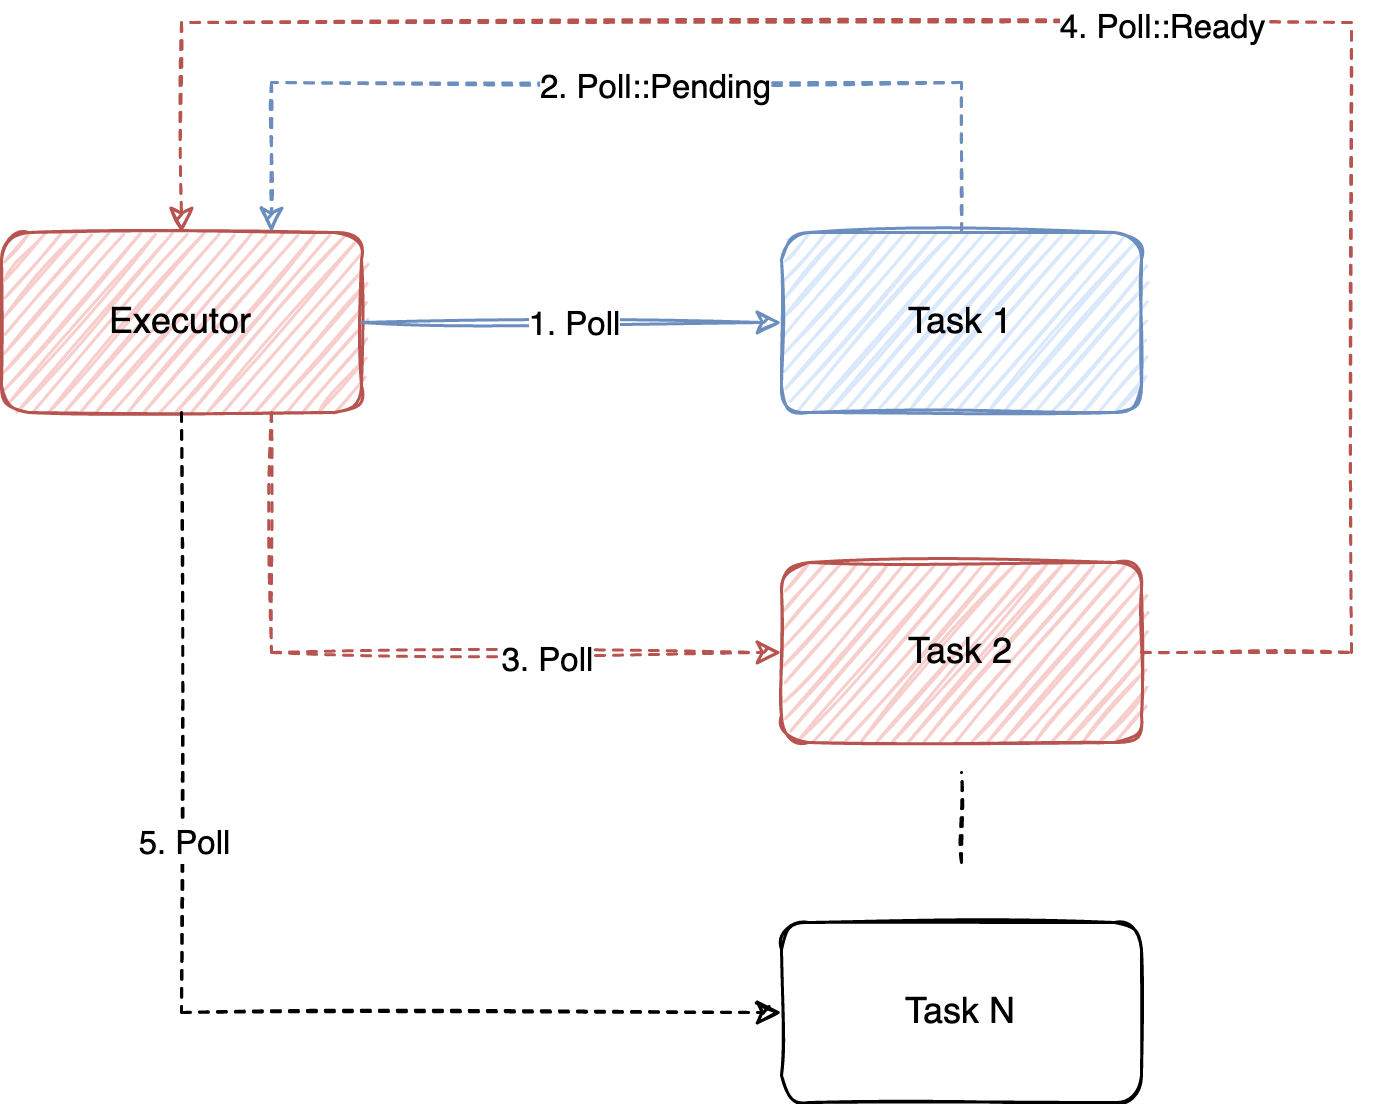
If you use the #[embassy_executor::main] macro in your application, it creates the Executor for you and spawns the main entry point as the first task. You can also create the Executor manually, and you can in fact create multiple Executors.
Interrupts
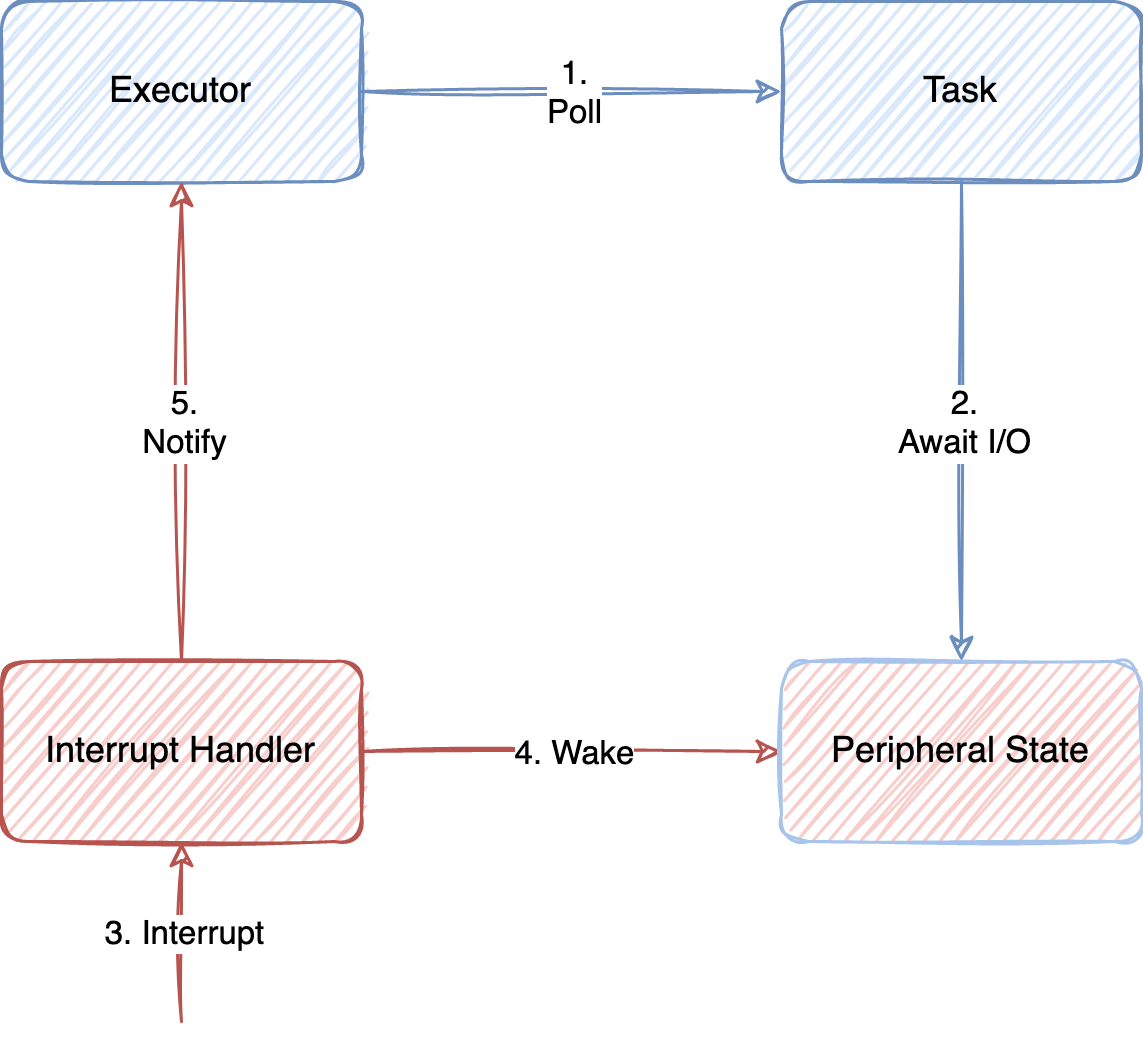
Interrupts are a common way for peripherals to signal completion of some operation and fits well with the async execution model. The following diagram describes a typical application flow where (1) a task is polled and is attempting to make progress. The task then (2) instructs the peripheral to perform some operation, and awaits. After some time has passed, (3) an interrupt is raised, marking the completion of the operation.
The peripheral HAL then (4) ensures that interrupt signals are routed to the peripheral and updates the peripheral state with the results of the operation. The executor is then (5) notified that the task should be polled, which it will do.
|
Note
|
A special executor named InterruptExecutor can be driven by an interrupt. This can be used to drive tasks at different priority levels by creating multiple InterruptExecutor instances.
|
Time
Embassy features an internal timer queue enabled by the time feature flag. When enabled, Embassy assumes that a time Driver implementation exists for the platform. Embassy provides time drivers for the nRF, STM32, RPi Pico, WASM and Std platforms.
|
Note
|
Some embedded platforms' timer drivers might only support a limited number of alarms. Make sure that the number of tasks using the timer simultaneously do not exceed this limit. |
The timer speed is configurable at compile time using the time-tick-<frequency>. At present, the timer may be configured to run at 1000 Hz, 32768 Hz, or 1 MHz. Before changing the defaults, make sure the target HAL supports the particular frequency setting.
|
Note
|
If you do not require timers in your application, not enabling the time feature can save some CPU cycles and reduce power usage.
|
Bootloader
embassy-boot is a lightweight bootloader supporting firmware application upgrades in a power-fail-safe way, with trial boots and rollbacks.
The update method used is referred to as an A/B partition update scheme.
With a general-purpose OS, A/B partition update is accomplished by directly booting either the A or B partition depending on the update state.
To accomplish the same goal in a way that is portable across all microcontrollers, embassy-boot swaps data page by page (in both directions) between the DFU and the Active partition when a firmware update is triggered.
Because the original Active application is moved into the DFU partition during this update, the operation can be reversed if the update is interrupted or the new firmware does not flag that it booted successfully.
See the design section for more details on how this is implemented.
The bootloader can be used either as a library or be flashed directly if you are happy with the default configuration and capabilities.
By design, the bootloader does not provide any network capabilities. Networking capabilities for fetching new firmware can be provided by the user application, using the bootloader as a library for updating the firmware, or by using the bootloader as a library and adding this capability yourself.
The bootloader supports both internal and external flash by relying on the embedded-storage traits. The bootloader optionally supports the verification of firmware that has been digitally signed (recommended).
Hardware support
The bootloader supports:
-
nRF52 with and without softdevice
-
STM32 L4, WB, WL, L1, L0, F3, F7 and H7
-
Raspberry Pi: RP2040
In general, the bootloader works on any platform that implements the embedded-storage traits for its internal flash, but may require custom initialization code to work.
STM32L0x1 devices require the flash-erase-zero feature to be enabled.
Design
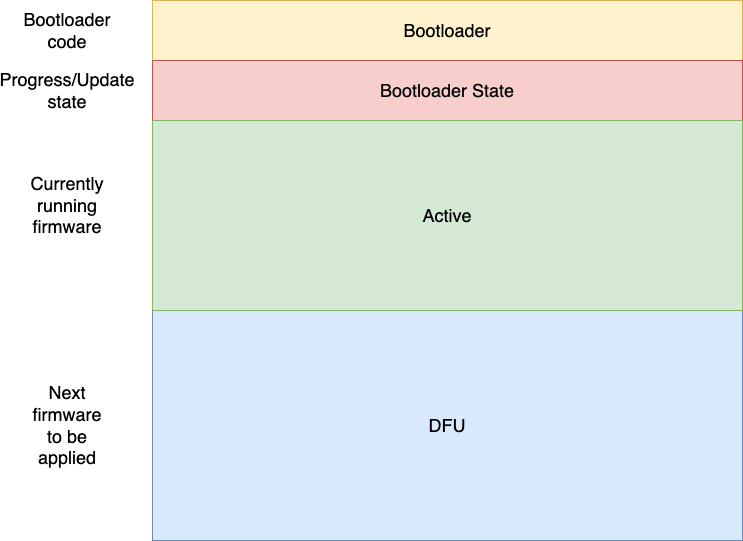
The bootloader divides the storage into 4 main partitions, configurable when creating the bootloader instance or via linker scripts:
-
BOOTLOADER - Where the bootloader is placed. The bootloader itself consumes about 8kB of flash, but if you need to debug it and have space available, increasing this to 24kB will allow you to run the bootloader with probe-rs.
-
ACTIVE - Where the main application is placed. The bootloader will attempt to load the application at the start of this partition. This partition is only written to by the bootloader. The size required for this partition depends on the size of your application.
-
DFU - Where the application-to-be-swapped is placed. This partition is written to by the application. This partition must be at least 1 page bigger than the ACTIVE partition, since the swap algorithm uses the extra space to ensure power safe copy of data:
Partition Sizedfu= Partition Sizeactive+ Page Sizeactive
All values are specified in bytes.
-
BOOTLOADER STATE - Where the bootloader stores the current state describing if the active and dfu partitions need to be swapped. When the new firmware has been written to the DFU partition, a magic field is written to instruct the bootloader that the partitions should be swapped. This partition must be able to store a magic field as well as the partition swap progress. The partition size is given by:
Partition Sizestate = (2 × Write Sizestate) + (4 × Write Sizestate × Partition Sizeactive / Page Sizeactive)
All values are specified in bytes.
The partitions for ACTIVE (+BOOTLOADER), DFU and BOOTLOADER_STATE may be placed in separate flash. The page size used by the bootloader is determined by the lowest common multiple of the ACTIVE and DFU page sizes. The BOOTLOADER_STATE partition must be big enough to store two words, plus four words per page in the ACTIVE partition.
The bootloader has a platform-agnostic part, which implements the power fail safe swapping algorithm given the boundaries set by the partitions. The platform-specific part is a minimal shim that provides additional functionality such as watchdogs or supporting the nRF52 softdevice.
|
Note
|
The linker scripts for the application and bootloader look similar, but the FLASH region must point to the BOOTLOADER partition for the bootloader, and the ACTIVE partition for the application. |
FirmwareUpdater
The FirmwareUpdater is an object for conveniently flashing firmware to the DFU partition and subsequently marking it as being ready for swapping with the active partition on the next reset. Its principle methods are write_firmware, which is called once per the size of the flash "write block" (typically 4KiB), and mark_updated, which is the final call.
Verification
The bootloader supports the verification of firmware that has been flashed to the DFU partition. Verification requires that firmware has been signed digitally using ed25519 signatures. With verification enabled, the FirmwareUpdater::verify_and_mark_updated method is called in place of mark_updated. A public key and signature are required, along with the actual length of the firmware that has been flashed. If verification fails then the firmware will not be marked as updated and therefore be rejected.
Signatures are normally conveyed with the firmware to be updated and not written to flash. How signatures are provided is a firmware responsibility.
To enable verification use either the ed25519-dalek or ed25519-salty features when depending on the embassy-boot crate. We recommend ed25519-salty at this time due to its small size.
Tips on keys and signing with ed25519
Ed25519 is a public key signature system where you are responsible for keeping the private key secure. We recommend embedding the public key in your program so that it can be easily passed to verify_and_mark_updated. An example declaration of the public key in your firmware:
static PUBLIC_SIGNING_KEY: &[u8] = include_bytes!("key.pub");Signatures are often conveyed along with firmware by appending them.
Ed25519 keys can be generated by a variety of tools. We recommend signify as it is in wide use to sign and verify OpenBSD distributions, and is straightforward to use.
The following set of Bash commands can be used to generate public and private keys on Unix platforms, and also generate a local key.pub file with the signify file headers removed. Declare a SECRETS_DIR environment variable in a secure location.
signify -G -n -p $SECRETS_DIR/key.pub -s $SECRETS_DIR/key.sec
tail -n1 $SECRETS_DIR/key.pub | base64 -d -i - | dd ibs=10 skip=1 > key.pub
chmod 700 $SECRETS_DIR/key.sec
export SECRET_SIGNING_KEY=$(tail -n1 $SECRETS_DIR/key.sec)
Then, to sign your firmware given a declaration of FIRMWARE_DIR and a firmware filename of myfirmware:
shasum -a 512 -b $FIRMWARE_DIR/myfirmware | head -c128 | xxd -p -r > $SECRETS_DIR/message.txt
signify -S -s $SECRETS_DIR/key.sec -m $SECRETS_DIR/message.txt -x $SECRETS_DIR/message.txt.sig
cp $FIRMWARE_DIR/myfirmware $FIRMWARE_DIR/myfirmware+signed
tail -n1 $SECRETS_DIR/message.txt.sig | base64 -d -i - | dd ibs=10 skip=1 >> $FIRMWARE_DIR/myfirmware+signed
Remember, guard the $SECRETS_DIR/key.sec key as compromising it means that another party can sign your firmware.
Time-keeping
In an embedded program, delaying a task is one of the most common actions taken. In an event loop, delays will need to be inserted to ensure that other tasks have a chance to run before the next iteration of the loop is called, if no other I/O is performed. Embassy provides abstractions to delay the current task for a specified interval of time.
The interface for time-keeping in Embassy is handled by the embassy-time crate. The types can be used with the internal timer queue in embassy-executor or a custom timer queue implementation.
Timer
The embassy_time::Timer type provides two timing methods.
Timer::at creates a future that completes at the specified Instant, relative to the system boot time.
Timer::after creates a future that completes after the specified Duration, relative to when the future was created.
An example of a delay is provided as follows:
|
Tip
|
Dependencies needed to run this example can be found here. |
use embassy_executor::task;
use embassy_time::{Duration, Timer};

#[task]
/// Task that ticks periodically
async fn tick_periodic() -> ! {
    loop {
        rprintln!("tick!");
        // async sleep primitive, suspends the task for 500ms.
        Timer::after(Duration::from_millis(500)).await;
    }
}
Delay
The embassy_time::Delay type provides an implementation of the embedded-hal and
embedded-hal-async traits. This can be used for drivers
that expect a generic delay implementation to be provided.
An example of how this can be used:
|
Tip
|
Dependencies needed to run this example can be found here. |
use embassy_executor::task;
use embassy_time::Delay;

#[task]
/// Task that ticks periodically
async fn tick_periodic() -> ! {
    loop {
        rprintln!("tick!");
        // async sleep primitive, suspends the task for 500ms.
        generic_delay(Delay).await
    }
}

async fn generic_delay<D: embedded_hal_async::delay::DelayNs>(delay: D) {
      delay.delay_ms(500).await;
}
Hardware Abstraction Layer (HAL)
Embassy provides HALs for several microcontroller families:
-
embassy-mcxafor MCX-A microcontrollers from NXP. -
embassy-mspm0for the MSPM0 and MSPS003 microcontrollers from Texas Instruments -
embassy-nrffor the nRF microcontrollers from Nordic Semiconductor -
embassy-stm32for STM32 microcontrollers from ST Microelectronics -
embassy-rpfor the Raspberry Pi RP2040 and RP235x microcontrollers
Outside of the Embassy project there are several Embassy compatible HALs:
These HALs implement async/await functionality for most peripherals while also implementing the
async traits in embedded-hal and embedded-hal-async. You can also use these HALs with another executor.
Embassy iMXRT HAL
The Embassy iMXRT HAL is based on the following PACs (Peripheral Access Crate):
Embassy MCX-A HAL
The Embassy MCX-A HAL is based on the following PAC (Peripheral Access Crate):
Embassy nRF HAL
The Embassy nRF HAL is based on the PACs (Peripheral Access Crate) from nrf-rs.
Peripherals
The following peripherals have a HAL implementation at present
-
PWM
-
SPIM
-
QSPI
-
NVMC
-
GPIOTE
-
RNG
-
TIMER
-
WDT
-
TEMP
-
PPI
-
UARTE
-
TWIM
-
SAADC
Bluetooth
For bluetooth, you can use the nrf-softdevice crate.
Embassy STM32 HAL
The Embassy STM32 HAL is based on the stm32-metapac project.
The infinite variant problem
STM32 microcontrollers come in many families, and flavors and supporting all of them is a big undertaking. Embassy has taken advantage of the fact that the STM32 peripheral versions are shared across chip families. Instead of re-implementing the SPI peripheral for every STM32 chip family, embassy has a single SPI implementation that depends on code-generated register types that are identical for STM32 families with the same version of a given peripheral.
The metapac
The stm32-metapac module uses pre-generated chip and register definitions for STM32 chip families to generate register types. This is done at compile time based on Cargo feature flags.
The chip and register definitions are located in a separate module, stm32-data, which is modified whenever a bug is found in the definitions, or when adding support for new chip families.
Sharing peripherals between tasks
Often, more than one task needs to access the same resource (pin, communication interface, etc.). Embassy provides many different synchronization primitives in the embassy-sync crate.
The following examples show different ways for two tasks to use the on-board LED on a Raspberry Pi Pico board simultaneously.
Sharing using a Mutex
Using mutual exclusion is the simplest way to share a peripheral.
|
Tip
|
Dependencies needed to run this example can be found here. |
use defmt::*;
use embassy_executor::Spawner;
use embassy_rp::gpio;
use embassy_sync::blocking_mutex::raw::ThreadModeRawMutex;
use embassy_sync::mutex::Mutex;
use embassy_time::{Duration, Ticker};
use gpio::{AnyPin, Level, Output};
use {defmt_rtt as _, panic_probe as _};

type LedType = Mutex<ThreadModeRawMutex, Option<Output<'static, AnyPin>>>;
static LED: LedType = Mutex::new(None);

#[embassy_executor::main]
async fn main(spawner: Spawner) {
    let p = embassy_rp::init(Default::default());
    // set the content of the global LED reference to the real LED pin
    let led = Output::new(AnyPin::from(p.PIN_25), Level::High);
    // inner scope is so that once the mutex is written to, the MutexGuard is dropped, thus the
    // Mutex is released
    {
        *(LED.lock().await) = Some(led);
    }
    let dt = 100 * 1_000_000;
    let k = 1.003;

    unwrap!(spawner.spawn(toggle_led(&LED, Duration::from_nanos(dt))));
    unwrap!(spawner.spawn(toggle_led(&LED, Duration::from_nanos((dt as f64 * k) as u64))));
}

// A pool size of 2 means you can spawn two instances of this task.
#[embassy_executor::task(pool_size = 2)]
async fn toggle_led(led: &'static LedType, delay: Duration) {
    let mut ticker = Ticker::every(delay);
    loop {
        {
            let mut led_unlocked = led.lock().await;
            if let Some(pin_ref) = led_unlocked.as_mut() {
                pin_ref.toggle();
            }
        }
        ticker.next().await;
    }
}
The structure facilitating access to the resource is the defined LedType.
Why so complicated
Unwrapping the layers gives insight into why each one is needed.
Mutex<RawMutexType, T>
The mutex is there so if one task gets the resource first and begins modifying it, all other tasks wanting to write will have to wait (the led.lock().await will return immediately if no task has locked the mutex, and will block if it is accessed somewhere else).
Sharing using a Channel
A channel is another way to ensure exclusive access to a resource. Using a channel is great in the cases where the access can happen at a later point in time, allowing you to enqueue operations and do other things.
|
Tip
|
Dependencies needed to run this example can be found here. |
use defmt::*;
use embassy_executor::Spawner;
use embassy_rp::gpio;
use embassy_sync::blocking_mutex::raw::ThreadModeRawMutex;
use embassy_sync::channel::{Channel, Sender};
use embassy_time::{Duration, Ticker};
use gpio::{AnyPin, Level, Output};
use {defmt_rtt as _, panic_probe as _};

enum LedState {
     Toggle,
}
static CHANNEL: Channel<ThreadModeRawMutex, LedState, 64> = Channel::new();

#[embassy_executor::main]
async fn main(spawner: Spawner) {
    let p = embassy_rp::init(Default::default());
    let mut led = Output::new(AnyPin::from(p.PIN_25), Level::High);

    let dt = 100 * 1_000_000;
    let k = 1.003;

    unwrap!(spawner.spawn(toggle_led(CHANNEL.sender(), Duration::from_nanos(dt))));
    unwrap!(spawner.spawn(toggle_led(CHANNEL.sender(), Duration::from_nanos((dt as f64 * k) as u64))));

    loop {
        match CHANNEL.receive().await {
            LedState::Toggle => led.toggle(),
        }
    }
}

// A pool size of 2 means you can spawn two instances of this task.
#[embassy_executor::task(pool_size = 2)]
async fn toggle_led(control: Sender<'static, ThreadModeRawMutex, LedState, 64>, delay: Duration) {
    let mut ticker = Ticker::every(delay);
    loop {
        control.send(LedState::Toggle).await;
        ticker.next().await;
    }
}
This example replaces the Mutex with a Channel, and uses another task (the main loop) to drive the LED. The advantage of this approach is that only a single task references the peripheral, separating concerns. However, using a Mutex has a lower overhead and might be necessary if you need to ensure that the operation is completed before continuing to do other work in your task.
An example showcasing more methods for sharing can be found here.
Sharing an I2C or SPI bus between multiple devices
An example of how to deal with multiple devices sharing a common I2C or SPI bus can be found here.
Frequently Asked Questions
These are a list of unsorted, commonly asked questions and answers.
Please feel free to add items to this page, especially if someone in the chat answered a question for you!
How to deploy to RP2040 or RP235x without a debugging probe.
Install Picotool for uploading the binary.
Configure the runner to use this tool, add this to .cargo/config.toml:
[target.'cfg(all(target_arch = "arm", target_os = "none"))']
runner = "picotool load --update --verify --execute -t elf"
Picotool will detect your device and upload the binary, skipping identical flash sectors (the --update command-line flag), verify that the binary was written correctly (--verify), and then run your new code (--execute). Run picotool help load for more information.
Missing main macro
If you see an error like this:
#[embassy_executor::main]
|                   ^^^^ could not find `main` in `embassy_executor`
You are likely missing some features of the embassy-executor crate.
For Cortex-M targets, check whether ALL of the following features are enabled in your Cargo.toml for the embassy-executor crate:
-
arch-cortex-m -
executor-thread
For ESP32, consider using the executors and #[main] macro provided by esp-hal.
Why is my binary so big?
The first step to managing your binary size is to set up your profiles.
[profile.release]
lto = true
opt-level = "s"
incremental = false
codegen-units = 1
# note: debug = true is okay - debuginfo isn't flashed to the device!
debug = true
All of these flags are elaborated on in the Rust Book page linked above.
My binary is still big… filled with std::fmt stuff!
This means your code is sufficiently complex that panic! invocation’s formatting requirements could not be optimized out, despite your usage of panic-halt or panic-reset.
You can remedy this by adding the following to your .cargo/config.toml:
[unstable]
build-std = ["core"]
build-std-features = ["panic_immediate_abort"]
This replaces all panics with a UDF (undefined) instruction.
Depending on your chipset, this will exhibit different behavior.
Refer to the spec for your chipset, but for thumbv6m, it results in a hardfault. Which can be configured like so:
#[exception]
unsafe fn HardFault(_frame: &ExceptionFrame) -> ! {
    SCB::sys_reset() // <- you could do something other than reset
}
Refer to cortex-m’s exception handling for more info.
embassy-time throws linker errors
If you see linker error like this:
  = note: rust-lld: error: undefined symbol: _embassy_time_now
          >>> referenced by driver.rs:127 (src/driver.rs:127)
          >>>               embassy_time-846f66f1620ad42c.embassy_time.4f6a638abb75dd4c-cgu.0.rcgu.o:(embassy_time::driver::now::hefb1f99d6e069842) in archive Devel/Embedded/pogodyna/target/thumbv7em-none-eabihf/debug/deps/libembassy_time-846f66f1620ad42c.rlib

          rust-lld: error: undefined symbol: _embassy_time_schedule_wake
          >>> referenced by driver.rs:144 (src/driver.rs:144)
          >>>               embassy_time-846f66f1620ad42c.embassy_time.4f6a638abb75dd4c-cgu.0.rcgu.o:(embassy_time::driver::schedule_wake::h530a5b1f444a6d5b) in archive Devel/Embedded/pogodyna/target/thumbv7em-none-eabihf/debug/deps/libembassy_time-846f66f1620ad42c.rlib
You probably need to enable a time driver for your HAL (not in embassy-time!). For example with embassy-stm32, you might need to enable time-driver-any:
[dependencies.embassy-stm32]
version = "0.1.0"
features = [
    # ...
    "time-driver-any", # Add this line!
    # ...
]
If you are in the early project setup phase and not using anything from the HAL, make sure the HAL is explicitly used to prevent the linker removing it as dead code by adding this line to your source:
use embassy_stm32 as _;Another common error you may experience is:
 = note: rust-lld: error: undefined symbol: __pender
          >>> referenced by mod.rs:373 (src/raw/mod.rs:373)
          >>>               embassy_executor-e78174e249bca7f4.embassy_executor.1e9d60fc90940543-cgu.0.rcgu.o:(embassy_executor::raw::Pender::pend::h0f19b6e01762e4cd) in archive [...]libembassy_executor-e78174e249bca7f4.rlib
There are two possible causes to this error:
-
You are using
embassy-executorwithout enabling one of the architecture-specific features, but you are using a HAL that does not bring its own executors. For example, for Cortex-M (like the RP2040), you need to enable thearch-cortex-mfeature ofembassy-executor. -
You are not using
embassy-executor. In this case, you need to enable the one of thegeneric-queue-Xfeatures ofembassy-time.
Error: Only one package in the dependency graph may specify the same links value.
You have multiple versions of the same crate in your dependency tree. This means that some of your embassy crates are coming from crates.io, and some from git, each of them pulling in a different set of dependencies.
To resolve this issue, make sure to only use a single source for all your embassy crates!
To do this, you should patch your dependencies to use git sources using [patch.crates.io]
and maybe [patch.'https://github.com/embassy-rs/embassy.git'].
Example:
[patch.crates-io]
embassy-time-queue-utils = { git = "https://github.com/embassy-rs/embassy.git", rev = "7f8af8a" }
embassy-time-driver = { git = "https://github.com/embassy-rs/embassy.git", rev = "7f8af8a" }
# embassy-time = { git = "https://github.com/embassy-rs/embassy.git", rev = "7f8af8a" }
Note that the git revision should match any other embassy patches or git dependencies that you are using!
How can I optimize the speed of my embassy-stm32 program?
-
Make sure RCC is set up to go as fast as possible
-
Make sure flash cache is enabled
-
build with
--release -
Set the following keys for the release profile in your
Cargo.toml:-
opt-level = "s" -
lto = "fat"
-
-
Set the following keys in the
[unstable]section of your.cargo/config.toml-
build-std = ["core"] -
build-std-features = ["panic_immediate_abort"]
-
-
When using
InterruptExecutor:-
disable
executor-thread -
make
mainspawn everything, then enable SCB.SLEEPONEXIT andloop { cortex_m::asm::wfi() } -
Note: If you need 2 priority levels, using 2 interrupt executors is better than 1 thread executor + 1 interrupt executor.
-
Can I use manual ISRs alongside Embassy?
Yes! This can be useful if you need to respond to an event as fast as possible, and the latency caused by the usual “ISR, wake, return from ISR, context switch to woken task” flow is too much for your application.
You may simply define a #[interrupt] fn INTERRUPT_NAME() {} handler as you would in any other embedded rust project.
Or you may define a struct implementing the embassy-[family]::interrupt::typelevel::Handler trait with an on_interrupt() method, and bind it to the interrupt vector via the bind_interrupts! macro, which introduces only a single indirection. This allows the mixing of manual ISRs with Embassy driver-defined ISRs; handlers will be called directly in the order they appear in the macro.
How can I measure resource usage (CPU, RAM, etc.)?
For CPU Usage:
There are a couple techniques that have been documented, generally you want to measure how long you are spending in the idle or low priority loop.
We need to document specifically how to do this in embassy, but this older post describes the general process.
If you end up doing this, please update this section with more specific examples!
For Static Memory Usage
Tools like cargo size and cargo nm from cargo-binutils can tell you the size of any globals or other static usage. Specifically you will want to see the size of the .data and .bss sections, which together make up the total global/static memory usage.
For Max Stack Usage
Check out cargo-call-stack for statically calculating worst-case stack usage. There are some caveats and inaccuracies possible with this, but this is a good way to get the general idea. See the README for more details.
The memory definition for my STM chip seems wrong, how do I define a memory.x file?
It could happen that your project compiles, flashes but fails to run. The following situation can be true for your setup:
The memory.x is generated automatically when enabling the memory-x feature on the embassy-stm32 crate in the Cargo.toml file.
This, in turn, uses stm32-metapac to generate the memory.x file for you. Unfortunately, more often than not this memory definition is not correct.
You can override this by adding your own memory.x file. Such a file could look like this:
MEMORY
{
  FLASH (rx) : ORIGIN = 0x08000000, LENGTH = 1024K
  RAM (xrw)  : ORIGIN = 0x20000000, LENGTH = 320K
}

_stack_start = ORIGIN(RAM) + LENGTH(RAM);
Please refer to the STM32 documentation for the specific values suitable for your board and setup. The STM32 Cube examples often contain a linker script .ld file.
Look for the MEMORY section and try to determine the FLASH and RAM sizes and section start.
If you find a case where the memory.x is wrong, please report it on this Github issue so other users are not caught by surprise.
The USB examples are not working on my board, is there anything else I need to configure?
If you are trying out the USB examples and your device does not connect, the most common issues are listed below.
Incorrect RCC config
Check your board and crystal/oscillator, in particular make sure that HSE is set to the correct value, e.g. 8_000_000 Hertz if your board does indeed run on a 8 MHz oscillator.
VBUS detection on STM32 platform
The USB specification requires that all USB devices monitor the bus for detection of plugging/unplugging actions. The devices must pull-up the D+ or D- lane as soon as the host supplies VBUS.
See the docs, for example at usb/struct.Config.html for information on how to enable/disable vbus_detection.
When the device is powered only from the USB bus that simultaneously serves as the data connection, this is optional. (If there’s no power in VBUS the device would be off anyway, so it’s safe to always assume there’s power in VBUS, i.e. the USB cable is always plugged in). If your device doesn’t have the required connections in place to allow VBUS sensing (see below), then this option needs to be set to false to work.
When the device is powered from another power source and therefore can stay powered through USB cable plug/unplug events, then this must be implemented and vbus_detection MUST be set to true.
If your board is powered from the USB and you are unsure whether it supports vbus_detection, consult the schematics of your board to see if VBUS is connected to PA9 for USB Full Speed or PB13 for USB High Speed, vice versa, possibly with a voltage divider. When designing your own hardware, see ST application note AN4879 (in particular section 2.6) and the reference manual of your specific chip for more details.
Known issues (details and/or mitigations)
These are issues that are commonly reported. Help wanted fixing them, or improving the UX when possible!
STM32H5 and STM32H7 power issues
STM32 chips with built-in power management (SMPS and LDO) settings often cause user problems when the configuration does not match how the board was designed.
Settings from the examples, or even from other working boards, may not work on YOUR board, because they are wired differently.
Additionally, some PWR settings require a full device reboot (and enough time to discharge any power capacitors!), making this hard to troubleshoot. Also, some "wrong" power settings will ALMOST work, meaning it will sometimes work on some boots, or for a while, but crash unexpectedly.
There is not a fix for this yet, as it is board/hardware dependant. See this tracking issue for more details
STM32 BDMA only working out of some RAM regions
The STM32 BDMA controller included in some STM32H7 chips has to be configured to use only certain regions of RAM, otherwise the transfer will fail.
If you see errors that look like this:
DMA: error on BDMA@1234ABCD channel 4You need to set up your linker script to define a special region for this area and copy data to that region before using with BDMA.
General steps:
-
Find out which memory region BDMA has access to. You can get this information from the bus matrix and the memory mapping table in the STM32 datasheet.
-
Add the memory region to
memory.x, you can modify the generated one from https://github.com/embassy-rs/stm32-data-generated/tree/main/data/chips. -
You might need to modify
build.rsto make cargo pick up the modifiedmemory.x. -
In your code, access the defined memory region using
#[unsafe(link_section = ".xxx")] -
Copy data to that region before using BDMA.
See SMT32H7 SPI BDMA example for more details.
How do I switch to the main branch?
Sometimes to test new changes or fixes, you’ll want to switch your project to using a version from GitHub.
You can add a section to your Cargo.toml file like this, you’ll need to patch ALL embassy crates to the same revision:
Using patch will replace all direct AND indirect dependencies.
See the new project docs for more details on this approach.
[patch.crates-io]
# make sure to get the latest git rev from github, you can see the latest one here:
# https://github.com/embassy-rs/embassy/commits/main/
embassy-embedded-hal = { git = "https://github.com/embassy-rs/embassy",     rev = "4cade64ebd34bf93458f17cfe85c5f710d0ff13c" }
embassy-executor     = { git = "https://github.com/embassy-rs/embassy",     rev = "4cade64ebd34bf93458f17cfe85c5f710d0ff13c" }
embassy-rp           = { git = "https://github.com/embassy-rs/embassy",     rev = "4cade64ebd34bf93458f17cfe85c5f710d0ff13c" }
embassy-sync         = { git = "https://github.com/embassy-rs/embassy",     rev = "4cade64ebd34bf93458f17cfe85c5f710d0ff13c" }
embassy-time         = { git = "https://github.com/embassy-rs/embassy",     rev = "4cade64ebd34bf93458f17cfe85c5f710d0ff13c" }
embassy-usb          = { git = "https://github.com/embassy-rs/embassy",     rev = "4cade64ebd34bf93458f17cfe85c5f710d0ff13c" }
embassy-usb-driver   = { git = "https://github.com/embassy-rs/embassy",     rev = "4cade64ebd34bf93458f17cfe85c5f710d0ff13c" }
How do I add support for a new microcontroller to embassy?
This is particularly for cortex-m, and potentially risc-v, where there is already support for basics like interrupt handling, or even already embassy-executor support for your architecture.
This is a much harder path than just using Embassy on an already supported chip. If you are a beginner, consider using embassy on an existing, well supported chip for a while, before you decide to write drivers from scratch. It’s also worth reading the existing source of supported Embassy HALs, to get a feel for how drivers are implemented for various chips. You should already be comfortable reading and writing unsafe code, and understanding the responsibilities of writing safe abstractions for users of your HAL.
This is not the only possible approach, but if you are looking for where to start, this is a reasonable way to tackle the task:
-
First, drop by the Matrix room or search around to see if someone has already started writing drivers, either in Embassy or otherwise in Rust. You might not have to start from scratch!
-
Make sure the target is supported in probe-rs, it likely is, and if not, there is likely a cmsis-pack you can use to add support so that flashing and debugging is possible. You will definitely appreciate being able to debug with SWD or JTAG when writing drivers!
-
See if there is an SVD (or SVDs, if it’s a family) available, if it is, run it through chiptool to create a PAC for low level register access. If not, there are other ways (like scraping the PDF datasheets or existing C header files), but these are more work than starting from the SVD file to define peripheral memory locations necessary for writing drivers.
-
Either make a fork of embassy repo, and add your target there, or make a repo that just contains the PAC and an empty HAL. It doesn’t necessarily have to live in the embassy repo at first.
-
Get a hello world binary working on your chip, either with minimal HAL or just PAC access, use delays and blink a light or send some raw data on some interface, make sure it works and you can flash, debug with defmt + RTT, write a proper linker script, etc.
-
Get basic timer operations and timer interrupts working, upgrade your blinking application to use hardware timers and interrupts, and ensure they are accurate (with a logic analyzer or oscilloscope, if possible).
-
Implement the embassy-time driver API with your timer and timer interrupt code, so that you can use embassy-time operations in your drivers and applications.
-
Then start implementing whatever peripherals you need, like GPIOs, UART, SPI, I2C, etc. This is the largest part of the work, and will likely continue for a while! Don’t feel like you need 100% coverage of all peripherals at first, this is likely to be an ongoing process over time.
-
Start implementing the embedded-hal, embedded-io, and embedded-hal-async traits on top of your HAL drivers, once you start having more features completed. This will allow users to use standard external device drivers (e.g. sensors, actuators, displays, etc.) with your HAL.
-
Discuss upstreaming the PAC/HAL for embassy support, or make sure your drivers are added to the awesome-embedded-rust list so that people can find it.
Multiple Tasks, or one task with multiple futures?
Some examples end like this in main:
// Run everything concurrently.
// If we had made everything `'static` above instead, we could do this using separate tasks instead.
join(usb_fut, join(echo_fut, log_fut)).await;
There are two main ways to handle concurrency in Embassy:
-
Spawn multiple tasks, e.g. with
#[embassy_executor::task] -
Manage multiple futures inside ONE task using
join()orselect()(as shown above)
In general, either of these approaches will work. The main differences of these approaches are:
When using separate tasks, each task needs its own RAM allocation, so there’s a little overhead for each task, so one task that does three things will likely be a little bit smaller than three tasks that do one thing (not a lot, probably a couple dozen bytes). In contrast, with multiple futures in one task, you don’t need multiple task allocations, and it will generally be easier to share data, or use borrowed resources, inside of a single task. An example showcasing some methods for sharing things between tasks can be found here.
But when it comes to "waking" tasks, for example when a data transfer is complete or a button is pressed, it’s faster to wake a dedicated task, because that task does not need to check which future is actually ready. join and select must check ALL of the futures they are managing to see which one (or which ones) are ready to do more work. This is because all Rust executors (like Embassy or Tokio) only have the ability to wake tasks, not specific futures. This means you will use slightly less CPU time juggling futures when using dedicated tasks.
Practically, there’s not a LOT of difference either way - so go with what makes it easier for you and your code first, but there will be some details that are slightly different in each case.
splitting peripherals resources between tasks
There are two ways to split resources between tasks, either manually assigned or by a convenient macro. See this example
My code/driver works in debug mode, but not release mode (or with LTO)
Issues like these while implementing drivers often fall into one of the following general causes, which are a good list of common errors to check for:
-
Some kind of race condition - the faster code means you miss an interrupt or something
-
Some kind of UB, if you have unsafe code, or something like DMA with fences missing
-
Some kind of hardware errata, or some hardware misconfiguration like wrong clock speeds
-
Some issue with an interrupt handler, either enabling, disabling, or re-enabling of interrupts when necessary
-
Some kind of async issue, like not registering wakers fully before checking flags, or not registering or pending wakers at the right time
How can I prevent the thread-mode executor from going to sleep?
In some cases you might want to prevent the thread-mode executor from going to sleep, for example when doing so would result in current spikes that reduce analog performance. As a workaround, you can spawn a task that yields in a loop, preventing the executor from going to sleep. Note that this may increase power consumption.
#[embassy_executor::task]
async fn idle() {
    loop { embassy_futures::yield_now().await; }
}Troubleshooting Bootloader Restart Loops
If your bootloader restarts in a loop, there could be multiple reasons. Here are some things to check:
Validate the memory.x File
The bootloader performs critical checks when creating partitions using the addresses defined in memory.x. Ensure the following assertions hold true:
const {
    core::assert!(Self::PAGE_SIZE % ACTIVE::WRITE_SIZE as u32 == 0);
    core::assert!(Self::PAGE_SIZE % ACTIVE::ERASE_SIZE as u32 == 0);
    core::assert!(Self::PAGE_SIZE % DFU::WRITE_SIZE as u32 == 0);
    core::assert!(Self::PAGE_SIZE % DFU::ERASE_SIZE as u32 == 0);
}

// Ensure enough progress pages to store copy progress
assert_eq!(0, Self::PAGE_SIZE % aligned_buf.len() as u32);
assert!(aligned_buf.len() >= STATE::WRITE_SIZE);
assert_eq!(0, aligned_buf.len() % ACTIVE::WRITE_SIZE);
assert_eq!(0, aligned_buf.len() % DFU::WRITE_SIZE);
If any of these assertions fail, the bootloader will likely restart in a loop. This failure might not log any messages (e.g., when using defmt). Confirm that your memory.x file and flash memory align with these requirements.
Handling Panic Logging
Some panic errors might log messages, but certain microcontrollers reset before the message is fully printed. To ensure panic messages are logged, add a delay using no-operation (NOP) instructions before the reset:
#[panic_handler]
fn panic(_info: &core::panic::PanicInfo) -> ! {
    for _ in 0..10_000_000 {
        cortex_m::asm::nop();
    }
    cortex_m::asm::udf();
}