Welcome to the Trouble Documentation. This page is for everyone who wants to use Trouble and understand how Trouble works.
Introduction
TrouBLE is a Bluetooth Low Energy (BLE) Host implementation written in Rust, with a future goal of qualification.
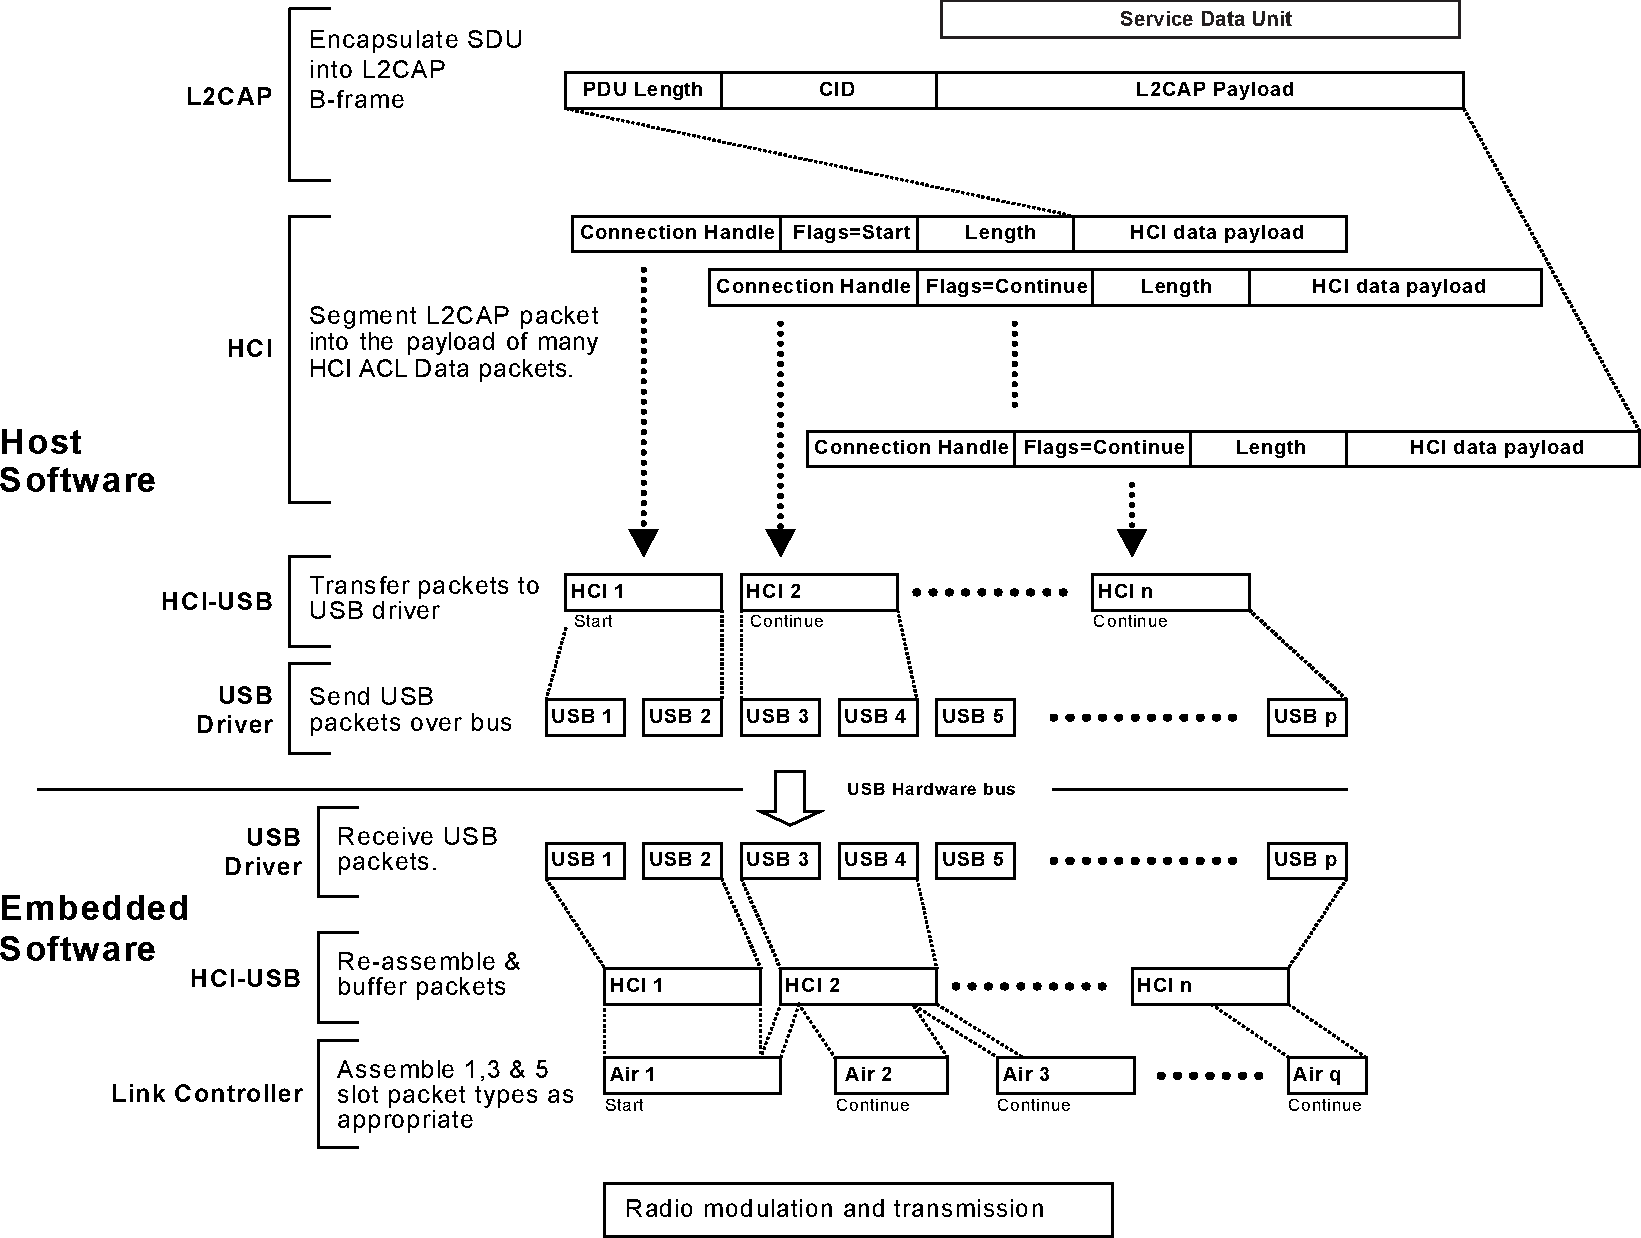
A BLE Host is one side of the Host Controller Interface (HCI). The BLE specification defines the software of a BLE implementation in terms of a controller (lower layer) and a host (upper layer).
These communicate via a standardized protocol, that may run over different transports such as as UART, USB or a custom in-memory IPC implementation.
The advantage of this split is that the Host can be reused for different controller implementations. This means that you can write BLE applications that can work on different hardware due to the HCI interface.
Trouble uses the bt-hci crate for the HCI interface, which means that any controller implementing the traits in bt-hci can work with Trouble. At present, the
following controllers are available:
The examples show how you can use Trouble with the different controllers.
The APIs available in Trouble are documented in rustdoc.
Concepts
A few BLE concepts frequently used in Trouble are explained here.
Central
A BLE central is a device that can scan and connect to other BLE devices. Usually the central is a more powerful device like a phone or a PC, but there are no restrictions on this, and battery powered embedded devices may also act as a central.
Peripheral
A BLE Peripheral is a device that advertises its presence and may be connected to. Common examples include heart rate monitors, fitness trackers, and smart sensors. Peripherals may use GATT (Generic Attribute Profile) to expose services and characteristics, but can also support l2cap connection oriented channels.
Communication Process
-
The Peripheral advertises its presence using advertising packets.
-
The Central scans for nearby Peripherals and initiates a connection.
-
Once connected, both the central and peripheral may open an l2cap channel and/or a GATT server/client.
Addresses
Every BLE device is identified by a unique Bluetooth Device Address, which is a 48-bit identifier similar to a MAC address. BLE addresses are categorized into two main types: Public and Random.
Public Address
A Public Address is globally unique and assigned by the IEEE. It remains constant and is typically used by devices requiring a stable identifier.
Random Address
A Random Address can be static or dynamic:
-
Static Random Address: Remains fixed until the device restarts or resets.
-
Private Random Address: Changes periodically for privacy purposes. It can be Resolvable (can be linked to the original device using an Identity Resolving Key) or Non-Resolvable (completely anonymous).
Random addresses enhance privacy by preventing device tracking.
GATT
The Generic Attribute Profile (GATT) defines how data is organized and exchanged over a BLE connection. It is the most common way BLE devices expose functionality.
Services
A service groups related data into a logical unit, identified by a UUID. For example, the Battery Service (0x180F) exposes battery-related data. Services can be standard (defined by the Bluetooth SIG) or custom (using a 128-bit UUID).
Characteristics
A characteristic is an individual data value within a service. Each characteristic has:
-
A UUID identifying what it represents (e.g., Battery Level
0x2A19). -
Properties defining permitted operations: read, write, write without response, notify, and indicate.
-
A value that holds the actual data.
-
Optional descriptors providing additional metadata.
Notifications and Indications
The server can push data to connected clients without the client polling:
-
Notifications are fire-and-forget; the server sends data without waiting for confirmation.
-
Indications require the client to acknowledge receipt.
Both require the client to opt in by writing to the characteristic’s CCCD (Client Characteristic Configuration Descriptor).
L2CAP
The Logical Link Control and Adaptation Protocol (L2CAP) provides the data transport layer for BLE. GATT and other protocols run on top of L2CAP.
In addition to the fixed channels used by GATT and signaling, BLE supports Connection-Oriented Channels (CoC) for transferring arbitrary data with credit-based flow control. CoC channels are useful when GATT’s attribute-based model is too restrictive, such as bulk data transfer or custom protocols.
Each CoC is identified by a SPSM (Simplified Protocol/Service Multiplexer) value, similar to a port number.
Security
BLE security protects data in transit and authenticates devices.
Pairing
Pairing is the process of establishing encryption keys between two devices. BLE supports two pairing modes:
-
LE Secure Connections (LESC) - Uses ECDH key exchange. Recommended for new designs.
-
Legacy Pairing - Uses a simpler key exchange. Required for compatibility with BLE 4.0/4.1 devices.
The pairing method (JustWorks, Numeric Comparison, PassKey Entry) is determined by the IO capabilities of both devices.
Bonding
Bonding is the process of storing the encryption keys from pairing so they can be reused in future connections. This allows reconnecting devices to re-encrypt immediately without re-pairing. Bond information includes a Long Term Key (LTK) and optionally an Identity Resolving Key (IRK) for resolving private addresses.
Security Levels
-
No Encryption - No protection. Default for new connections.
-
Encrypted - Link is encrypted but the peer is not authenticated (JustWorks pairing).
-
Encrypted and Authenticated - Link is encrypted and the peer’s identity is verified via MITM-protected pairing (PassKey or Numeric Comparison).
Getting started
This example walks through the various configuration options you can use for a trouble application and how you can create a basic instance of Trouble. For more advanced examples, see the examples.
A trouble application needs two pieces of configuration:
-
Cargo features specified on the
trouble-hostcrate. -
Generics specified on the
HostResourcestype.
Cargo features
The following features enable/disable features in the host:
-
central - enables the central BLE role, allowing the devices to create connections.
-
scan - extends the central BLE role allowing the device to scan for devices.
-
peripheral - enables the peripheral BLE role, allowing the device to advertise its presence.
-
gatt - enables GATT client and server support.
-
derive - enables macros for defining GATT services.
-
security - enables support for the security manager for pairing/bonding.
-
controller-host-flow-control - enables controller-host flow control (not supported by all controllers).
-
connection-metrics - enable additional connection metrics that increases the per-connection RAM requirements.
The following features configure queue sizes and memory pools (N is any number supported in the features list):
-
connection-event-queue-size-N - per-connection queue size of events (disconnects, connection update events).
Normally the events in this queue are infrequent, so the size defaults to a low value.
-
l2cap-rx-queue-size-N - per-l2cap channel queue size of inbound data.
The RX queue size is used to size the per-connection inbound GATT data queues as well as the L2CAP connection oriented channel queues. The size of the queue determines how many in-flight packets you can have per channel, and the RAM usage therefore varies with the number of channels and the length of the queue. The packets in the queue are allocated from packet pool configured for the host, and does not contribute directly to the RAM usage.
-
l2cap-tx-queue-size-N - per-l2cap channel queue size of outbound data.
The TX queue size is used to size the outbound GATT queue. The packets in the queue are allocated from the packet pool configured for the host, and does not contribute directly to the RAM usage.
-
default-packet-pool - enables a default builtin packet pool.
-
default-packet-pool-size-N - size of the default packet pool. + Configures the number of packets available in the default packet pool, if enabled. This significantly impacts the RAM usage which can be derived from the size of the pool and the mtu. The pool should be sized based on the number of connections, channels, queue lengths and expected throughput.
-
default-packet-pool-mtu-N - size of the default packet pool packets. + Configures the size of packets available in the default packet pool, if enabled. This significantly impacts the RAM usage which can be derived from the size of the pool and the mtu. The pool should be sized based on the number of connections, channels, queue lengths and expected throughput.
-
gatt-client-notification-max-subscribers-N - GATT client max notification subscribers.
When using the GATT client, this controls how many subscribers can be created.
-
gatt-client-notification-queue-size-N - GATT client queue size for inbound notifications.
When using the GATT client, this controls how many notifications can be queued for each subscriber.
A common question is why the above settings are not const generics, and the reason is that it would obfuscate the API too much, and they generally do not need to be changed from the defaults.
HostResources
The HostResources type holds references to all packets, connections, channels and other data used by Trouble. The following
generic parameters can be set:
-
PacketPool - Allocator used for payloads. Should be sized according to your attribute size or l2cap MTU.
-
CONNS - max number of BLE connections supported.
-
CHANNELS - max number of L2CAP channels supported (not including GATT).
-
ADV_SETS - max number of advertising sets (the default of 1 is appropriate for most applications).
The following instance would allow you to have up to 4 connections and 2 l2cap channels with an MTU configured by the default-packet-pool-mtu-N feature.
let mut resources: HostResources<DefaultPacketPool, 4, 2, 1> = HostResources::new();Creating the stack
With the resources defined, an instance of Trouble can be created using the trouble_host::new() function, which returns a StackBuilder:
let stack = trouble_host::new(controller, &mut resources)
    .set_random_address(address)
    .build();
The StackBuilder allows you to set some properties of the host before creating it:
-
set_random_addressfor specifying a BLE random address (see xref:_random_address). -
enable_privacyfor enabling BLE address privacy with a given Identity Resolving Key (IRK), so the controller generates Resolvable Private Addresses (RPAs) that rotate periodically (requiressecurityfeature). -
set_rpa_timeoutfor configuring the RPA rotation timeout (defaults to 900 seconds per the BLE specification, requiressecurityfeature). -
set_random_generator_seedfor specifying the random seed used by the security manager (requiressecurityfeature). -
set_io_capabilitiesfor configuring IO capabilities used during pairing (requiressecurityfeature). -
set_secure_connections_onlyfor enabling Secure Connections Only mode, which rejects legacy pairing (requireslegacy-pairingfeature).
Once properties are set, call .build() to obtain the Stack. Then use the stack to obtain handles for the roles you need:
let runner = stack.runner();
let central = stack.central();
let peripheral = stack.peripheral();
The availability of central() and peripheral() depends on whether the corresponding cargo features are enabled.
The runner is responsible for running the BLE host stack, and should be passed to an async task that typically runs forever. It will only
consume CPU resources when there are work to do (accepting connections/channels, creating connections/channels, sending/receiving data).
For instance, an embassy application would use it like this:
// As a generic async function using join:
use embassy_futures::join::join;

let _ = join(
    async {
        loop {
            if let Err(e) = runner.run().await {
                panic!("BLE runner error: {:?}", e);
            }
        }
    },
    async {
        // Your application logic here (advertise, connect, etc.)
    },
).await;
Alternatively, if your application doesn’t need the runner to be generic, you can spawn it as a static embassy task:
#[embassy_executor::task]
async fn ble_task(mut runner: Runner<'static, SoftdeviceController<'static>>) {
    loop {
        runner.run().await.ok();
    }
}

spawner.must_spawn(ble_task(runner));
Summary
Now that BLE stack is created, you can go create some awesome BLE applications. The examples cover the following:
-
Scanning for peripherals
-
Central connecting to peripherals and using the GATT client.
-
Central connecting to peripherals and creating L2CAP connection oriented channels.
-
Peripheral advertising and providing a GATT service.
-
Peripheral advertising and accepting L2CAP connection oriented channels.
GATT Services
The Generic Attribute Profile (GATT) defines how BLE devices exchange data using services and characteristics. Trouble provides both a GATT server (peripheral exposing data) and a GATT client (central consuming data), along with proc macros for ergonomic service definitions.
Enable GATT support with the gatt feature, and the proc macros with the derive feature (both included in default features).
Defining Services
Services are defined as Rust structs annotated with #[gatt_service]. Each field becomes a characteristic.
use trouble_host::prelude::*;

#[gatt_service(uuid = "180f")]
struct BatteryService {
    #[characteristic(uuid = "2a19", read, notify, value = 10)]
    level: u8,
}
Service Attributes
-
uuid(required) - Service UUID. Accepts 16-bit short ("180f"), 128-bit ("7e701cf1-b1df-42a1-bb5f-6a1028c793b0"), or predefined constants (service::BATTERY).
Characteristic Attributes
-
uuid(required) - Characteristic UUID. -
read- Readable by clients. -
write- Writable by clients (with response). -
write_without_response- Writable without response. -
notify- Supports notifications (server-initiated, no confirmation). -
indicate- Supports indications (server-initiated, with confirmation). -
value = <expr>- Initial value. Supports literals, byte arrays, and const expressions. -
permissions(encrypted)- Require an encrypted connection. -
permissions(authenticated)- Require an authenticated (MITM-protected) connection.
Supported field types: u8, u16, u32, u64, f32, f64, bool, [u8; N], and heapless::Vec<u8, N>.
Descriptors
Characteristics can have descriptors, defined as additional attributes on the field:
#[gatt_service(uuid = service::BATTERY)]
struct BatteryService {
    #[descriptor(uuid = descriptors::VALID_RANGE, read, value = [0, 100])]
    #[descriptor(uuid = descriptors::MEASUREMENT_DESCRIPTION, name = "hello", read, value = "Battery Level", type = &'static str)]
    #[characteristic(uuid = characteristic::BATTERY_LEVEL, read, notify, value = 10)]
    level: u8,
}
Descriptor attributes: uuid (required), read, value, name, type.
The GATT Server
Combine multiple services into a server with #[gatt_server]:
#[gatt_server]
struct Server {
    battery_service: BatteryService,
}
Create the server with a GAP configuration:
let server = Server::new_with_config(GapConfig::Peripheral(PeripheralConfig {
    name: "TrouBLE",
    appearance: &appearance::power_device::GENERIC_POWER_DEVICE,
}))
.unwrap();
Handling GATT Events
After accepting a connection, attach the attribute server and process events in a loop:
let conn = advertiser.accept().await?.with_attribute_server(&server)?;

let level = server.battery_service.level;
loop {
    match conn.next().await {
        GattConnectionEvent::Disconnected { reason } => break,
        GattConnectionEvent::Gatt { event } => {
            match &event {
                GattEvent::Read(event) => {
                    if event.handle() == level.handle {
                        let value = conn.get(&level);
                        info!("Read battery level: {:?}", value);
                    }
                }
                GattEvent::Write(event) => {
                    if event.handle() == level.handle {
                        info!("Write to battery level: {:?}", event.data());
                    }
                }
                _ => {}
            }
            // Accept the event and send the response. Also performed on drop,
            // but calling explicitly ensures the reply is sent promptly.
            match event.accept() {
                Ok(reply) => reply.send().await,
                Err(e) => warn!("Error sending response: {:?}", e),
            }
        }
        _ => {}
    }
}
Reading and Writing Values
// Read the current value of a characteristic
let value = server.get(&server.battery_service.level);

// Set a characteristic value
server.set(&server.battery_service.level, &75).unwrap();
Notifications and Indications
Send updates to connected clients that have subscribed:
let level = server.battery_service.level;

// Notification (no confirmation from client)
level.notify(&conn, &new_value, true).await?;

// Indication (waits for client confirmation)
level.indicate(&conn, &new_value, true).await?;|
Note
|
Notifications/indications will only be delivered if the client has enabled them by writing to the characteristic’s CCCD (Client Characteristic Configuration Descriptor). The notify and indicate calls return an error if the client hasn’t subscribed.
|
The GATT Client
The GATT client is used from the central role to discover and interact with services on a connected peripheral.
let conn = central.connect(&config).await.unwrap();
let client = GattClient::<C, DefaultPacketPool, 10>::new(&stack, &conn).await.unwrap();
The third generic parameter (10) is the maximum number of attributes the client can discover.
|
Important
|
The GATT client has a background task that must run concurrently: |
let _ = join(client.task(), async {
    // Your client operations here
}).await;
Service Discovery
// Find a service by UUID
let services = client.services_by_uuid(&Uuid::new_short(0x180f)).await.unwrap();
let service = services.first().unwrap().clone();

// Find a characteristic by UUID within a service
let c: Characteristic<u8> = client
    .characteristic_by_uuid(&service, &Uuid::new_short(0x2a19))
    .await
    .unwrap();
Reading and Writing
// Read a characteristic
let mut data = [0; 1];
client.read_characteristic(&c, &mut data[..]).await.unwrap();

// Write a characteristic (with response)
client.write_characteristic(&c, &[42]).await.unwrap();

// Write without response
client.write_characteristic_without_response(&c, &[42]).await.unwrap();
Subscribing to Notifications
// Subscribe (writes the CCCD automatically)
let mut listener = client.subscribe(&c, false).await.unwrap();

// Receive notifications
loop {
    let data = listener.next().await;
    info!("Got notification: {:?}", data.as_ref());
}
Pass true to subscribe() for indications instead of notifications.
Full Example
A complete peripheral with a battery service that notifies a counter value:
use embassy_futures::join::join;
use embassy_futures::select::select;
use trouble_host::prelude::*;

const CONNECTIONS_MAX: usize = 1;
const L2CAP_CHANNELS_MAX: usize = 2; // Signal + ATT

#[gatt_server]
struct Server {
    battery_service: BatteryService,
}

#[gatt_service(uuid = service::BATTERY)]
struct BatteryService {
    #[characteristic(uuid = characteristic::BATTERY_LEVEL, read, notify, value = 10)]
    level: u8,
}

pub async fn run<C: Controller>(controller: C) {
    let address = Address::random([0xff, 0x8f, 0x1a, 0x05, 0xe4, 0xff]);
    let mut resources: HostResources<C, DefaultPacketPool, CONNECTIONS_MAX, L2CAP_CHANNELS_MAX> =
        HostResources::new();
    let stack = trouble_host::new(controller, &mut resources)
        .set_random_address(address)
        .build();
    let runner = stack.runner();
    let mut peripheral = stack.peripheral();

    let server = Server::new_with_config(GapConfig::Peripheral(PeripheralConfig {
        name: "TrouBLE",
        appearance: &appearance::power_device::GENERIC_POWER_DEVICE,
    })).unwrap();

    let _ = join(
        async { loop { runner.run().await.ok(); } },
        async {
            loop {
                // Advertise and wait for connection
                let mut adv_data = [0; 31];
                let len = AdStructure::encode_slice(
                    &[
                        AdStructure::Flags(LE_GENERAL_DISCOVERABLE | BR_EDR_NOT_SUPPORTED),
                        AdStructure::CompleteLocalName(b"TrouBLE"),
                    ],
                    &mut adv_data[..],
                ).unwrap();
                let advertiser = peripheral.advertise(
                    &Default::default(),
                    Advertisement::ConnectableScannableUndirected {
                        adv_data: &adv_data[..len],
                        scan_data: &[],
                    },
                ).await.unwrap();
                let conn = advertiser.accept().await.unwrap().with_attribute_server(&server).unwrap();

                // Run GATT event handler and notification task concurrently
                let level = server.battery_service.level;
                select(
                    async {
                        loop {
                            match conn.next().await {
                                GattConnectionEvent::Disconnected { .. } => break,
                                GattConnectionEvent::Gatt { event } => {
                                    event.accept().ok();
                                }
                                _ => {}
                            }
                        }
                    },
                    async {
                        let mut tick: u8 = 0;
                        loop {
                            tick = tick.wrapping_add(1);
                            let _ = level.notify(&conn, &tick, true).await;
                            Timer::after_secs(2).await;
                        }
                    },
                ).await;
            }
        },
    ).await;
}
L2CAP Connection-Oriented Channels
L2CAP Connection-Oriented Channels (CoC) provide a way to exchange arbitrary data between two BLE devices without the overhead of the GATT protocol. They use credit-based flow control to prevent overwhelming either device.
L2CAP CoC support is available without any additional feature flags beyond central and/or peripheral.
Resource Configuration
When using L2CAP CoC channels, you need to allocate an extra L2CAP channel slot in HostResources beyond the default signal and ATT channels:
const CONNECTIONS_MAX: usize = 1;
const L2CAP_CHANNELS_MAX: usize = 3; // Signal + ATT + 1 CoC channel

let mut resources: HostResources<MyController, DefaultPacketPool, CONNECTIONS_MAX, L2CAP_CHANNELS_MAX> =
    HostResources::new();
Channel Configuration
let config = L2capChannelConfig {
    mtu: Some(PAYLOAD_LEN as u16),   // Service Data Unit size
    mps: Some(251),                   // Max PDU payload size (frame size)
    flow_policy: CreditFlowPolicy::Every(1), // When to grant credits
    initial_credits: Some(10),        // Credits granted at connection start
};
All fields are optional and have sensible defaults:
-
mtu- Maximum payload size per send/receive. Defaults to packet pool MTU minus 6. -
mps- Frame size (one frame consumes one credit). Defaults to packet pool MTU minus 4. -
flow_policy- Controls when credits are replenished. Defaults toEvery(1). -
initial_credits- Credits given to the peer at channel creation. Defaults to the minimum of the RX queue size and packet pool capacity.
Creating Channels
Central (initiator)
let conn = central.connect(&connect_config).await.unwrap();

let config = L2capChannelConfig {
    mtu: Some(PAYLOAD_LEN as u16),
    ..Default::default()
};
let mut ch = L2capChannel::create(&stack, &conn, 0x0081, &config).await.unwrap();
The third argument is the SPSM (Simplified Protocol/Service Multiplexer). Values in the range 0x0080-0x00FF are available for custom use.
Peripheral (responder)
SPSMs must be registered on the StackBuilder before use:
let (stack, runner) = trouble_host::new(controller, &mut resources, &mut stack)
    .set_random_address(address)
    .register_l2cap_spsm(0x0081)
    .build();
The simplest approach accepts any incoming channel request:
let conn = advertiser.accept().await.unwrap();

let config = L2capChannelConfig {
    mtu: Some(PAYLOAD_LEN as u16),
    ..Default::default()
};
let mut ch = L2capChannel::listen(&stack, &conn).accept(&config).await.unwrap();
For more control, use listen to get a listener, then next to inspect each request before accepting:
let listener = L2capChannel::listen(&stack, &conn);

let pending = listener.next().await.unwrap();

// Inspect the incoming request
let spsm = pending.spsm();
let peer_mtu = pending.mtu();

// Accept or reject
let ch = pending.accept(&stack, &config).await.unwrap();
// OR: pending.reject(&stack, LeCreditConnResultCode::UnacceptableParameters).await.unwrap();
Sending and Receiving Data
// Send data (waits for available credits)
let tx = [0x42; PAYLOAD_LEN];
ch.send(&stack, &tx).await.unwrap();

// Non-blocking send (returns Error::Busy if no credits)
ch.try_send(&stack, &tx).unwrap();

// Receive data (blocks until data available)
let mut rx = [0; PAYLOAD_LEN];
let len = ch.receive(&stack, &mut rx).await.unwrap();

// Receive as an owned SDU packet
let sdu = ch.receive_sdu(&stack).await.unwrap();
let data: &[u8] = sdu.as_ref();
The send buffer must be no larger than the negotiated MTU. The receive buffer must be at least as large as the negotiated MTU.
Credit-Based Flow Control
Credits prevent a sender from overwhelming the receiver. Each sent frame consumes one credit. When credits run out, send() blocks until the peer grants more.
The CreditFlowPolicy controls when your device replenishes credits to the peer:
-
Every(N)- Grant credits for every N messages received. Default isEvery(1). -
MinThreshold(N)- Grant credits when the available count drops below N.
For high-throughput scenarios, a less frequent credit policy with more initial credits reduces signaling overhead:
let config = L2capChannelConfig {
    mtu: Some(2504),
    mps: Some(247),
    flow_policy: CreditFlowPolicy::Every(50),
    initial_credits: Some(200),
};
Splitting Channels
For concurrent reading and writing, split a channel into separate endpoints:
let (mut writer, mut reader) = ch.split();

// Use in separate concurrent tasks
join(
    async {
        writer.send(&stack, &data).await.unwrap();
    },
    async {
        let len = reader.receive(&stack, &mut buf).await.unwrap();
    },
).await;

// Merge back if needed
let ch = L2capChannel::merge(writer, reader);
Channel Properties
ch.mtu()        // Local negotiated MTU
ch.mps()        // Local negotiated MPS
ch.peer_mtu()   // Remote device's MTU
ch.peer_mps()   // Remote device's MPS
ch.spsm()       // Simplified Protocol/Service Multiplexer
ch.disconnect() // Disconnect the channel
Full Example
A peripheral that accepts an L2CAP channel and echoes received data:
use embassy_futures::join::join;
use trouble_host::prelude::*;

const CONNECTIONS_MAX: usize = 1;
const L2CAP_CHANNELS_MAX: usize = 3;
const PAYLOAD_LEN: usize = 27;

pub async fn run<C: Controller>(controller: C) {
    let address = Address::random([0xff, 0x8f, 0x1a, 0x05, 0xe4, 0xff]);
    let mut resources: HostResources<C, DefaultPacketPool, CONNECTIONS_MAX, L2CAP_CHANNELS_MAX> =
        HostResources::new();
    let stack = trouble_host::new(controller, &mut resources)
        .set_random_address(address)
        .register_l2cap_spsm(0x0081)
        .build();
    let mut runner = stack.runner();
    let mut peripheral = stack.peripheral();

    let _ = join(runner.run(), async {
        loop {
            // Advertise and accept connection
            let mut adv_data = [0; 31];
            let len = AdStructure::encode_slice(
                &[AdStructure::Flags(LE_GENERAL_DISCOVERABLE | BR_EDR_NOT_SUPPORTED)],
                &mut adv_data[..],
            ).unwrap();
            let advertiser = peripheral.advertise(
                &Default::default(),
                Advertisement::ConnectableScannableUndirected {
                    adv_data: &adv_data[..len],
                    scan_data: &[],
                },
            ).await.unwrap();
            let conn = advertiser.accept().await.unwrap();

            // Accept L2CAP channel
            let config = L2capChannelConfig {
                mtu: Some(PAYLOAD_LEN as u16),
                ..Default::default()
            };
            let mut ch = L2capChannel::listen(&stack, &conn).accept(&config).await.unwrap();

            // Echo received data
            let mut buf = [0; PAYLOAD_LEN];
            loop {
                match ch.receive(&stack, &mut buf).await {
                    Ok(len) => {
                        ch.send(&stack, &buf[..len]).await.unwrap();
                    }
                    Err(_) => break,
                }
            }
        }
    }).await;
}
Security and Pairing
Trouble supports BLE pairing and encryption via the Security Manager, including LE Secure Connections (LESC) and optionally legacy pairing. Enable it with the security cargo feature. For legacy pairing support (BLE 4.0/4.1 devices), also enable legacy-pairing.
Setup
Security requires a cryptographically secure random seed:
let stack = trouble_host::new(controller, &mut resources)
    .set_random_address(address)
    .set_random_generator_seed(&mut rng)  // Must implement RngCore + CryptoRng
.build();|
Warning
|
The stack will panic at build time if the random generator is not seeded (unless the dev-disable-csprng-seed-requirement feature is enabled for development).
|
IO Capabilities
IO capabilities determine which pairing method is used. Set them before building the stack by calling stack.set_io_capabilities(). The available options are:
-
DisplayOnly- Device can display a 6-digit number. -
DisplayYesNo- Device can display a number and the user can confirm or reject. -
KeyboardOnly- Device has keyboard input. -
NoInputNoOutput- No user interaction possible (JustWorks only). -
KeyboardDisplay- Device has both keyboard and display.
The pairing method is automatically selected based on both devices' IO capabilities:
| Method | When used | Security level |
|---|---|---|
JustWorks |
Either device has |
|
Numeric Comparison |
Both have |
|
PassKey Entry |
One device can display, the other can input |
|
Requesting Security
Pairing can be initiated from either side:
// Central or peripheral can request security
conn.request_security().unwrap();
This triggers the pairing process. The result is delivered as events on the connection.
Handling Pairing Events
Pairing events are delivered through the connection event loop. When using a GATT server, they arrive as GattConnectionEvent variants; otherwise as ConnectionEvent:
loop {
    match conn.next().await {
        GattConnectionEvent::Disconnected { reason } => break,

        // Display a passkey for the user to enter on the other device
        GattConnectionEvent::PassKeyDisplay(key) => {
            info!("Display this passkey: {}", key);
        }

        // User must confirm the displayed number matches
        GattConnectionEvent::PassKeyConfirm(key) => {
            info!("Confirm passkey: {}", key);
            // After user confirms or rejects:
            conn.raw().pass_key_confirm().unwrap();
            // OR: conn.raw().pass_key_cancel().unwrap();
        }

        // User must input the passkey shown on the other device
        GattConnectionEvent::PassKeyInput => {
            let user_input: u32 = 123456; // Get from user
            conn.raw().pass_key_input(user_input).unwrap();
        }

        // Pairing succeeded
        GattConnectionEvent::PairingComplete { security_level, bond } => {
            info!("Paired with security level: {:?}", security_level);
            if let Some(bond) = bond {
                // Persist the bond information (see Bonding section)
            }
        }

        // Pairing failed
        GattConnectionEvent::PairingFailed(err) => {
            error!("Pairing failed: {:?}", err);
        }

        GattConnectionEvent::Gatt { event } => {
            event.accept().ok();
        }
        _ => {}
    }
}
Security Levels
Each connection has a security level that determines what operations are allowed:
-
NoEncryption- Default for new connections. No encryption. -
Encrypted- Encrypted but not authenticated (JustWorks pairing). -
EncryptedAuthenticated- Encrypted and MITM-protected (PassKey or Numeric Comparison).
Characteristics can require a minimum security level using the permissions attribute:
#[characteristic(uuid = "2a19", read, notify, permissions(encrypted))]
level: u8,

#[characteristic(uuid = "2a4a", read, permissions(authenticated))]
hid_info: [u8; 4],
When a client tries to access a characteristic without meeting the required security level, a GattEvent::NotAllowed event is generated.
Bonding
Bonding persists the encryption keys so that reconnecting devices can re-encrypt without re-pairing.
Controlling Bondable State
// Allow bonding for this connection (default)
conn.set_bondable(true).unwrap();

// Disable bonding (pairing will be temporary)
conn.set_bondable(false).unwrap();
If both devices are bondable, the PairingComplete event will contain bond: Some(BondInformation). If either side is not bondable, bond will be None.
Persisting Bonds
Bond information must be stored by the application (e.g., in flash storage). On startup, restore bonds to the stack:
use sequential_storage::map::{MapConfig, MapStorage, PostcardValue};
use serde::{Deserialize, Serialize};

#[derive(Serialize, Deserialize)]
struct StoredBondInformation(BondInformation);
impl<'a> PostcardValue<'a> for StoredBondInformation {}

// On startup: restore saved bonds
let mut map_storage = MapStorage::<(), _, _>::new(
    storage,
    MapConfig::new(0..erase_size * 2),
    NoCache::new(),
);
let mut buf = [0; 32];
if let Some(StoredBondInformation(bond)) = map_storage.fetch_item(&mut buf, &()).await.unwrap() {
    stack.add_bond_information(bond).unwrap();
}

// After pairing: save the new bond
match conn.next().await {
    GattConnectionEvent::PairingComplete { bond: Some(bond), .. } => {
        map_storage.store_item(&mut buf, &(), &StoredBondInformation(bond)).await.unwrap();
    }
    _ => {}
}
Enable the serde feature on trouble-host for BondInformation serialization support.
Platform Setup
Trouble works with any BLE controller that implements the bt_hci::controller::Controller trait. This page shows the initialization pattern for each supported platform.
All platforms follow the same pattern: create a platform-specific controller, then pass it to the shared application logic. The shared examples in examples/apps/ demonstrate this approach.
Linux
The simplest setup, useful for development and testing. Uses the host’s Bluetooth adapter via HCI sockets (requires Bluez).
use bt_hci::controller::ExternalController;
use bt_hci_linux::Transport;

#[tokio::main(flavor = "current_thread")]
async fn main() {
    let dev = 0; // HCI device number (hci0)
    let transport = Transport::new(dev).unwrap();
    let controller = ExternalController::<_, 8>::new(transport);

    // Pass controller to your application
    my_app::run(controller).await;
}
Dependencies:
[dependencies]
bt-hci = "0.8"
bt-hci-linux = { path = "../../bt-hci-linux" }
tokio = { version = "1", features = ["macros", "rt"] }
trouble-host = { version = "0.6", features = ["log"] }
The generic parameter on ExternalController (8) is the number of HCI command slots.
nRF52 / nRF54 (SoftDevice Controller)
Uses Nordic’s SoftDevice Controller via the nrf-sdc crate. Requires setting up the Multiprotocol Service Layer (MPSL) and configuring the SoftDevice.
#![no_std]
#![no_main]

use embassy_executor::Spawner;
use embassy_nrf::rng;
use nrf_sdc::{self as sdc, mpsl};
use static_cell::StaticCell;

#[embassy_executor::task]
async fn mpsl_task(mpsl: &'static mpsl::MultiprotocolServiceLayer<'static>) -> ! {
    mpsl.run().await
}

#[embassy_executor::main]
async fn main(spawner: Spawner) {
    let p = embassy_nrf::init(Default::default());

    // 1. Initialize MPSL
    let mpsl_p = mpsl::Peripherals::new(
        p.RTC0, p.TIMER0, p.TEMP,
        p.PPI_CH19, p.PPI_CH30, p.PPI_CH31,
    );
    let lfclk_cfg = mpsl::raw::mpsl_clock_lfclk_cfg_t {
        source: mpsl::raw::MPSL_CLOCK_LF_SRC_RC as u8,
        rc_ctiv: mpsl::raw::MPSL_RECOMMENDED_RC_CTIV as u8,
        rc_temp_ctiv: mpsl::raw::MPSL_RECOMMENDED_RC_TEMP_CTIV as u8,
        accuracy_ppm: mpsl::raw::MPSL_DEFAULT_CLOCK_ACCURACY_PPM as u16,
        skip_wait_lfclk_started: mpsl::raw::MPSL_DEFAULT_SKIP_WAIT_LFCLK_STARTED != 0,
    };
    static MPSL: StaticCell<mpsl::MultiprotocolServiceLayer> = StaticCell::new();
    let mpsl = MPSL.init(mpsl::MultiprotocolServiceLayer::new(mpsl_p, Irqs, lfclk_cfg));
    spawner.must_spawn(mpsl_task(mpsl));

    // 2. Configure SoftDevice Controller
    let sdc_p = sdc::Peripherals::new(/* PPI channels */);
    let mut rng = rng::Rng::new(p.RNG, Irqs);
    let mut sdc_mem = sdc::Mem::<4864>::new();
    let sdc = sdc::Builder::new().unwrap()
        .support_peripheral().unwrap()
        .peripheral_count(1).unwrap()
        .build(sdc_p, &mut rng, mpsl, &mut sdc_mem)
        .unwrap();

    // 3. Run application
    my_app::run(sdc).await;
}
The SoftDevice builder methods configure roles (support_central(), support_peripheral(), support_scan()) and buffer sizes (buffer_cfg()). See the nrf52 examples for complete configurations.
ESP32
Uses the ESP32’s built-in BLE radio via esp-radio.
#![no_std]
#![no_main]

use embassy_executor::Spawner;
use esp_hal::clock::CpuClock;
use esp_hal::timer::timg::TimerGroup;
use esp_radio::ble::controller::BleConnector;
use trouble_host::prelude::ExternalController;

#[esp_rtos::main]
async fn main(_s: Spawner) {
    let peripherals = esp_hal::init(
        esp_hal::Config::default().with_cpu_clock(CpuClock::max())
    );
    esp_alloc::heap_allocator!(size: 72 * 1024);

    let timg0 = TimerGroup::new(peripherals.TIMG0);
    esp_rtos::start(timg0.timer0, /* ... */);

    let connector = BleConnector::new(peripherals.BT, Default::default()).unwrap();
    let controller: ExternalController<_, 20> = ExternalController::new(connector);

    my_app::run(controller).await;
}
See the esp32 examples for complete configurations including interrupt setup.
Raspberry Pi Pico W
Uses the CYW43 WiFi/BLE chip via the cyw43 crate with PIO SPI.
#![no_std]
#![no_main]

use cyw43_pio::PioSpi;
use embassy_executor::Spawner;
use embassy_rp::gpio::{Level, Output};
use embassy_rp::pio::Pio;
use static_cell::StaticCell;
use trouble_host::prelude::ExternalController;

#[embassy_executor::task]
async fn cyw43_task(runner: cyw43::Runner<'static, /* ... */>) -> ! {
    runner.run().await
}

#[embassy_executor::main]
async fn main(spawner: Spawner) {
    let p = embassy_rp::init(Default::default());

    // Load firmware blobs
    let fw = include_bytes!("../../cyw43-firmware/43439A0.bin");
    let clm = include_bytes!("../../cyw43-firmware/43439A0_clm.bin");
    let btfw = include_bytes!("../../cyw43-firmware/43439A0_btfw.bin");

    // Set up PIO SPI
    let pwr = Output::new(p.PIN_23, Level::Low);
    let cs = Output::new(p.PIN_25, Level::High);
    let mut pio = Pio::new(p.PIO0, Irqs);
    let spi = PioSpi::new(/* ... */);

    // Initialize cyw43
    static STATE: StaticCell<cyw43::State> = StaticCell::new();
    let state = STATE.init(cyw43::State::new());
    let (_net, bt_device, mut control, runner) =
        cyw43::new_with_bluetooth(state, pwr, spi, fw, btfw, nvram).await;
    spawner.must_spawn(cyw43_task(runner));
    control.init(clm).await;

    let controller: ExternalController<_, 10> = ExternalController::new(bt_device);
    my_app::run(controller).await;
}
See the rp-pico-w examples for complete configurations.
STM32WB
Uses the BLE coprocessor on the STM32WB series via the embassy-stm32-wpan crate, which exposes a bt-hci controller adapter over the IPCC mailbox. Requires flashing ST’s wireless firmware (FUS + BLE HCI stack) onto the device before running the example.
#![no_std]
#![no_main]

use embassy_executor::Spawner;
use embassy_stm32::bind_interrupts;
use embassy_stm32::ipcc::{Config, ReceiveInterruptHandler, TransmitInterruptHandler};
use embassy_stm32::rcc;
use embassy_stm32_wpan::TlMbox;
use embassy_stm32_wpan::sub::{ble::ControllerAdapter, mm};

bind_interrupts!(struct Irqs {
    IPCC_C1_RX => ReceiveInterruptHandler;
    IPCC_C1_TX => TransmitInterruptHandler;
});

#[embassy_executor::task]
async fn run_mm_queue(mut memory_manager: mm::MemoryManager<'static>) {
    memory_manager.run_queue().await;
}

#[embassy_executor::main(executor = "embassy_stm32::executor::Executor", entry = "cortex_m_rt::entry")]
async fn main(spawner: Spawner) {
    let mut config = embassy_stm32::Config::default();
    config.rcc = rcc::Config::new_wpan();
    let p = embassy_stm32::init(config);

    // 1. Bring up the IPCC mailbox to talk to the wireless coprocessor.
    let (ble, mm) = TlMbox::wait_ready(p.IPCC, Irqs, Config::default())
        .await
        .unwrap()
        .init_ble(Default::default())
        .await
        .unwrap();
    spawner.spawn(run_mm_queue(mm).unwrap());

    // 2. The ControllerAdapter implements the bt-hci Controller trait.
    let controller = ControllerAdapter::new(ble);

    // 3. Run application
    my_app::run(controller).await;
}
See the stm32wb examples for complete configurations, including the steps to flash the FUS and BLE HCI firmware onto the coprocessor with STM32CubeProgrammer.
Serial HCI (UART)
For any Bluetooth controller connected over a UART (e.g., HCI dongles). Works on desktop with tokio.
use embassy_sync::blocking_mutex::raw::NoopRawMutex;
use tokio_serial::SerialStream;
use trouble_host::prelude::{ExternalController, SerialTransport};

#[tokio::main]
async fn main() {
    let port = SerialStream::open(
        &tokio_serial::new("/dev/ttyUSB0", 1000000)
    ).unwrap();

    let (reader, writer) = tokio::io::split(port);
    let reader = embedded_io_adapters::tokio_1::FromTokio::new(reader);
    let writer = embedded_io_adapters::tokio_1::FromTokio::new(writer);

    let driver: SerialTransport<NoopRawMutex, _, _> = SerialTransport::new(reader, writer);
    let controller: ExternalController<_, 10> = ExternalController::new(driver);

    my_app::run(controller).await;
}|
Note
|
The controller firmware’s buffer configuration may limit throughput. Check the serial-hci examples for details on firmware configuration. |
Performance
To achieve the best possible performance, some tuning is involved. Note this often has a trade-off of throughput, latency and power consumption, so the ideal configuration depends on your application.
Background
In order to understand what configurations need to be set and how, we will require some understanding of the Bluetooth hardware and lower layers of the software stack.
A Bluetooth controller, the actual physical radio, sends packets of data called the Protocol Data Unit (PDU). In Bluetooth communication, there are a number of different PDUs used with different physical channels for different purposes such as advertising and data transfer. These PDUs have different structures. For our example, we only need to focus on the Data Physical Channel PDU. As the name suggests, this is used in the transfer of data.
The structure of the Data Physical Channel PDU is shown below.
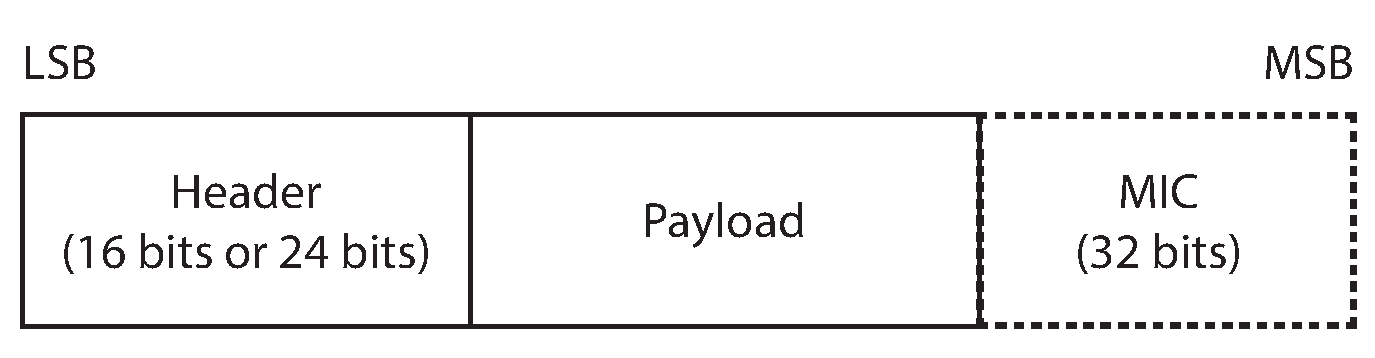
Since Bluetooth 4.2, the maximum size of the PDU payload, plus the MIC if included, has increased from 27 to 251 bytes. The maximum size of the PDU to be used in a connection, also known as the Maximum Transmission Unit (MTU), is negotiated between the central and peripheral device upon establishing a connection. The length of this payload is described in the PDU header.
A data physical channel PDU payload can be a Logic Link (LL) Data PDU or a LL Control PDU. These are differentiated by the LLID header bits.
For the purpose of these examples, we shall focus further on the LL data PDU. The payload of an LL data PDU contains Logical Link Control and Adaptation Protocol (L2CAP) data.
In a connection oriented channel, the L2CAP data has the following structure.
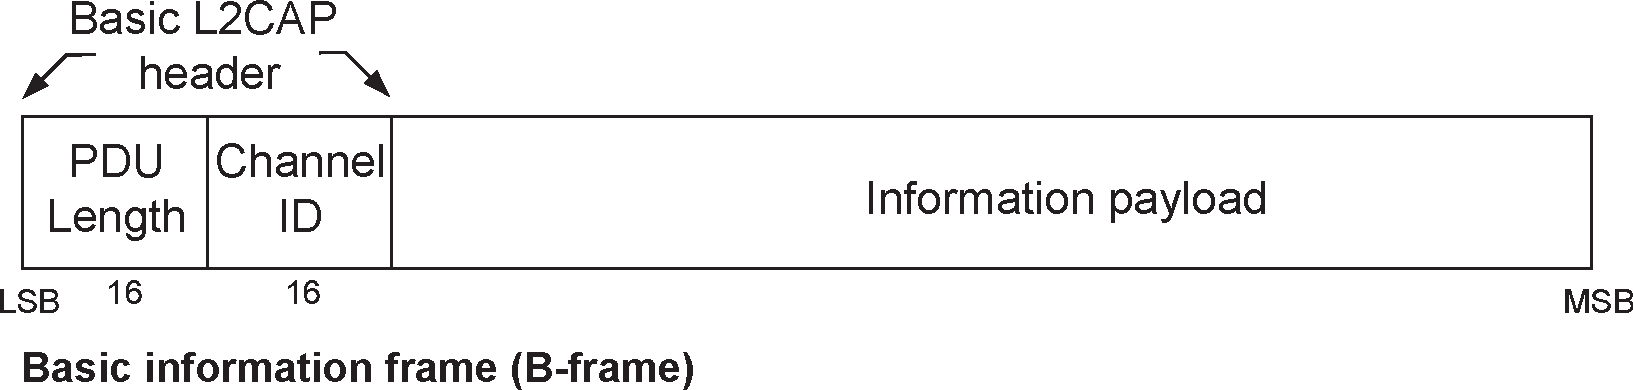
The L2CAP PDU length describes the length of the information payload. The maximum size of the information payload is 65533 bytes. This limit setting is known as the L2CAP MTU. Notably, this can be larger than the maximum size of the PDU payload. L2CAP payloads larger than the maximum size of the PDU payload will be fragmented into chunks no longer than the PDU MTU before being sent over the air.
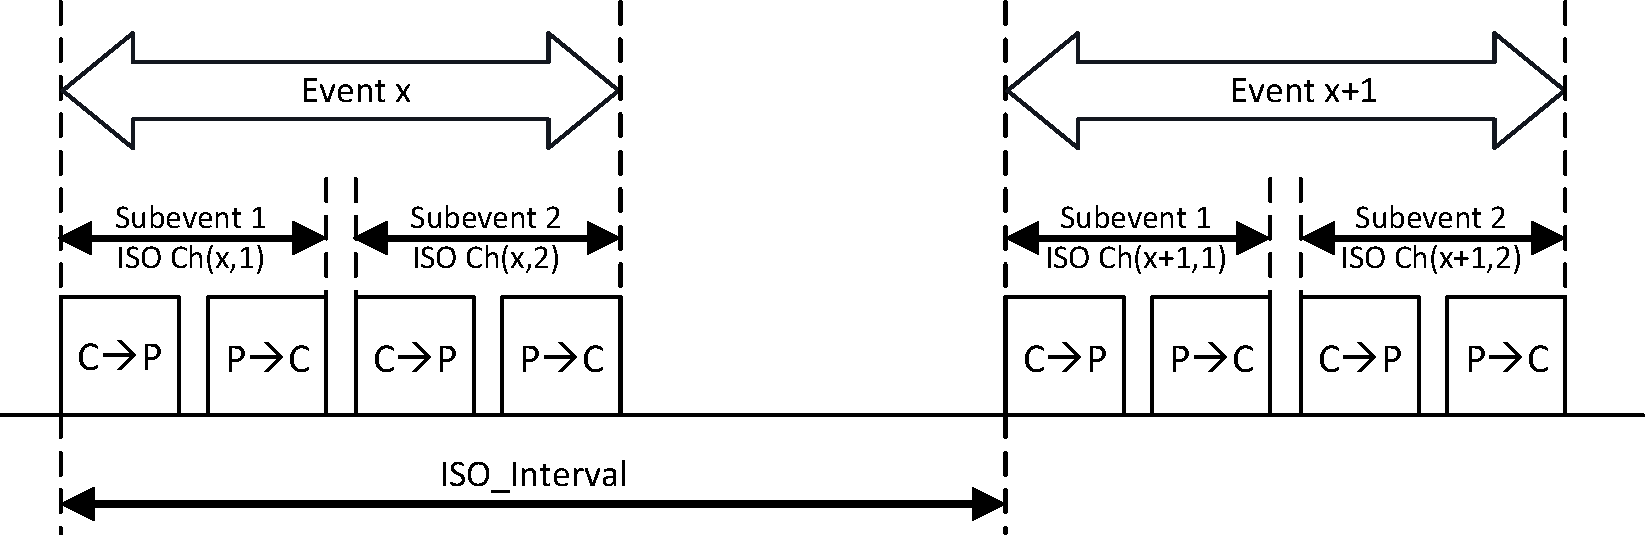
The primary goal of Bluetooth Low Energy (BLE) is to minimize energy consumption. BLE achieves this efficiency by keeping the radio off for the majority of the time, and only activating it when necessary. For instance, after a connection is established, data transfer occurs periodically during synchronized time windows called connection events. These events are separated by a negotiated time interval known as the connection interval. During each connection event, the central and peripheral radios briefly wake up to exchange data packets and then return to an idle state until the next event. This scheduled radio activity significantly reduces power usage compared to keeping the radio active continuously.
Since Bluetooth 5.0, Bluetooth controllers can double the symbol transmission rate from 1Mbps, known as 1M PHY, to 2Mbps, known as 2M PHY.
By understanding these configurations, we can adjust them to prioritize throughput over energy conservation.
Default configurations
A default BLE configuration optimised for backwards compatibility and energy conservation, like the ble_l2cap examples,
would have a PDU size of 27 and a high connection interval.
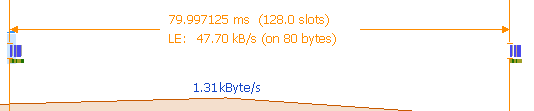
The Bluetooth packet timeline below depicts multiple packets being sent in one connection event. Blue represents useful data being sent.

The Bluetooth packet timeline below depicts bluetooth packets sent in different connection events. Notice the white gaps in both figures. To maximise throughput, we need to increase the ratio of blue in these diagrams.
The following sections describe how these configurations can be modified to maximise throughput.
Data Length Extension
Since Bluetooth 4.2, the maximum PDU size has increased from 27 to 251. For better throughput, a higher PDU should be used as 1. there will be fewer header bytes per packet of data 2. more data is sent in one go, reducing the waiting time required between sending consecutive packets.
To set this we use the HCI command LeSetDataLength with tx_octets = 251 and tx_time = 2120.
|
Note
|
This option is only available on the 1M and 2M phy. |
L2CAP MTU
Choosing the correct value for the L2CAP MTU can have a significant impact on throughput. If an L2CAP payload is larger than the PDU by 1 byte, this will be fragmented into two packets, one of size PDU and the other of size 1. The following diagram shows the packets when PDU = 251 and L2CAP MTU = 252.

Hence, it is important to choose an L2CAP MTU value that can neatly fit into a number of PDU packets. If the PDU length is set to 251, then the L2CAP MTU should be set to some multiple of this.
One other thing to note is that an L2CAP payload has 6 bytes of header. This means that for a smaller L2CAP MTU, more bytes are used for headers than service data.
The maximum size of the L2CAP MTU is 65533, however, this may be limited by the controller resources, see the next section.
HCI controller configuration
The size of the PDU and the maximum number of fragments an L2CAP PDU can be broken into may be limited by the HCI firmware. For example, in the serial-hci example, the HCI UART Bluetooth dongle firmware’s default has 3 27-byte long buffers. Hence, L2CAP PDUs greater than $ 27 \times 3 $ cannot be handled by the HCI firmware. These firmware configurations may be improved. If this is required for your target, check the target’s example readme for more information on how to do this.
To calculate the maximum L2CAP MTU allowed by the controller, we can multiply the size and number of available buffers. At its max, the HCI UART Bluetooth dongle firmware can have 20 251-byte long buffers. Hence, the largest possible L2CAP MTU supported by this firmware is 5020 bytes.
However, it can be beneficial not set the L2CAP MTU to this maximum. If the L2CAP MTU is set to the maximum buffer space available to the controller, the host will only be able to send a new packet once the all the buffers are free. This might cause the controller to switch off the radio until the next connection event once it has exhausted all the buffers, before receiving the next batch from the host. See diagram below.

However, if we allow a few extra buffers, the host will be able to send more data to the controller before it exhausts the data from the previous message. This will cause the radio to stay awake.

The change from 1M PHY in the above figures is denoted by the doubling of the packet height.
Service Data Unit size
If it can be controlled, such as when having a lot of available data to send, we can improve our throughput by sending data that neatly fits in L2CAP payloads.
Since an L2CAP payload has 4 bytes of header + 2 bytes for a connection oriented channel payload, this can be achieved by sending data that is a multiple of the L2CAP MTU - 6.
Connection Interval
If the L2CAP MTU is set such that it allows the host to constantly keep some controller buffers occupied, the controller will keep sending data until just before a new connection event is scheduled.
In this scenario, it makes sense to use a longer connection interval, however, this would increase latency and possibly lower throughput in noisy environments as when connections are dropped, the radio will idle until the next connection event.
Frequently Asked Questions
These are a list of unsorted, commonly asked questions and answers.
Please feel free to add items to this page, especially if someone in the chat answered a question for you!
How do I set the MTU?
The MTU is configured through two mechanisms:
-
Packet pool MTU - Set via the
default-packet-pool-mtu-Ncargo feature (e.g.,default-packet-pool-mtu-251). This determines the maximum size of each packet buffer. -
L2CAP channel MTU - Set per-channel via
L2capChannelConfig::mtuwhen creating L2CAP CoC channels.
For GATT, the ATT MTU is automatically negotiated based on the packet pool MTU. For best throughput, align these values with the PDU size; see the Performance section.
Why are queue sizes configured via feature flags instead of const generics?
Using const generics for queue sizes would add many generic parameters to most API types, making the API harder to use and read. Feature flags keep the common case simple while still allowing customization when needed. The defaults work well for most applications.
How many L2CAP channels do I need?
The L2CAP_CHANNELS_MAX parameter on HostResources counts the total number of L2CAP channels, including internal ones:
-
1 for the signaling channel (always required)
-
1 for ATT/GATT (if using GATT)
-
1 per L2CAP CoC channel you want to use concurrently
For a typical GATT-only application: 2 (signal + ATT). For GATT plus one CoC channel: 3.
How do I use multiple connections?
Increase the CONNECTIONS_MAX parameter on HostResources and configure your controller to support multiple connections (e.g., central_count(N) or peripheral_count(N) on the nrf-sdc builder). You will also need to increase L2CAP_CHANNELS_MAX proportionally, since each connection needs its own ATT and signal channels.
My connection keeps dropping, what should I check?
-
Supervision timeout - If the devices are far apart or in a noisy environment, the default supervision timeout may be too short. Try increasing it via connection parameters.
-
Connection interval - A very short connection interval may cause the controller to miss events under load. Try a longer interval.
-
Packet pool exhaustion - If the pool runs out of buffers, the stack cannot process incoming data. Increase
default-packet-pool-size-Nor reduce queue depths. -
Runner task not running - The
runner.run()future must be polled continuously. Ensure it is running concurrently with your application logic usingjoinor a spawned task.
Can I use Trouble without Embassy?
Trouble uses Embassy async primitives (embassy-sync, embassy-time) but does not require the Embassy executor. You can use it with any async executor that provides an embassy-time driver. The Linux examples use tokio as the executor.
What is the ExternalController wrapper?
ExternalController<T, N> wraps any transport implementing embedded-io read/write traits and provides an HCI controller interface. The generic parameter N is the number of concurrent HCI command slots. Use it when your controller communicates over a byte-stream transport (UART, USB, etc.) rather than providing a native Controller implementation.